
Broiled Scallops Recipe: How to Get That Golden Crust
Table of Contents
There’s something magical about perfectly broiled scallops – that caramelized golden crust giving way to the tender, sweet interior creates a seafood experience that rivals the finest restaurants. Yet many home cooks shy away from preparing scallops, fearing they might ruin these delicate treasures of the sea. I’m here to change that with my foolproof broiled scallops recipe that will give you restaurant-worthy results right in your own kitchen.
Thank you for reading this post, don't forget to subscribe!As a long-time seafood enthusiast who has prepared scallops countless ways, I can confidently say that broiling is one of the most rewarding methods – it creates that coveted golden crust while preserving the scallop’s naturally buttery texture. Whether you’re planning a romantic dinner, impressing guests, or simply treating yourself to something special, these broiled scallops will not disappoint. Let me walk you through creating this elegant dish that looks and tastes like it took hours to prepare, when it actually requires just minutes of your time.
How to Make Broiled Scallops
Quick Overview
Broiled scallops are a culinary delight that combines impressive presentation with surprising simplicity. What makes this dish truly remarkable is the contrast between the caramelized, slightly crispy exterior and the tender, succulent center. The high heat of broiling creates a beautiful Maillard reaction—the scientific term for that golden-brown crust packed with complex flavors—while keeping the inside perfectly juicy.
One of the greatest strengths of broiled scallops lies in their versatility. Their naturally sweet, delicate flavor serves as an ideal base for a wide range of seasonings and pairings—whether it’s a classic mix of butter and herbs or more intricate combinations like citrus, white wine, or garlic butter sauces. Every bite offers a fresh taste of the sea, elevated by your choice of flavors.
Perhaps the best news about this impressive dish is its preparation time: from start to finish, these broiled scallops take just 15 minutes to prepare. Prep work accounts for about 10 minutes, while the actual broiling time is a mere 5-7 minutes. This makes broiled scallops perfect for elegant weeknight dinners when you want something special without spending hours in the kitchen.
The Ingredients I Use to Bring My Broiled Scallops to Life
For this broiled scallops recipe, quality ingredients make all the difference. Here’s what you’ll need:
- 1 pound (about 16-20) large sea scallops, preferably “dry” scallops
- 2 tablespoons unsalted butter, melted
- 2 tablespoons extra virgin olive oil
- 3 cloves garlic, finely minced
- 1 tablespoon fresh lemon juice
- 1 teaspoon lemon zest
- 2 tablespoons finely chopped fresh parsley (with a little extra reserved for garnish)
- 1 tablespoon fresh thyme leaves (or alternatively, 1 teaspoon dried thyme)
- ½ teaspoon sea salt
- ¼ teaspoon freshly ground black pepper
- ¼ teaspoon paprika (optional, for color)
- Pinch of red pepper flakes (optional, for heat)
- Lemon wedges for serving
Step-by-Step Instructions
Preparing the Scallops
- Preheat your broiler: Position the oven rack about 6 inches from the heat source and preheat your broiler on high. Place a cast iron skillet or broiler-safe baking dish in the oven to preheat for about 5 minutes. Having a hot surface waiting for your scallops helps achieve that perfect sear.
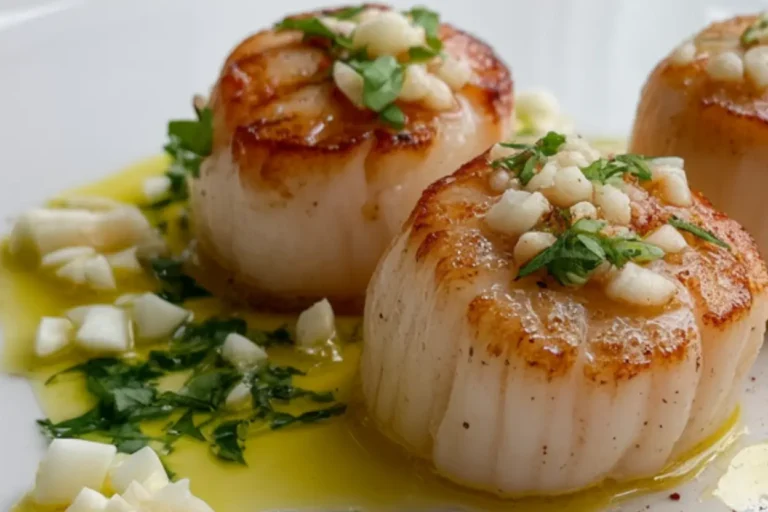
- Prepare the scallops: Rinse the scallops under cold water, then use paper towels to thoroughly dry them—this step is key for getting a golden, seared crust. Be sure to remove any small side muscle still attached (a tiny rectangular strip on the side) by gently pinching and pulling it off.
- Check for size uniformity: If your scallops vary greatly in size, consider cutting any exceptionally large ones in half horizontally. This ensures all scallops cook at the same rate.
Creating the Flavorful Butter Mixture
- Make the seasoned butter: In a medium bowl, combine the melted butter, olive oil, minced garlic, lemon juice, lemon zest, chopped parsley, thyme leaves, salt, pepper, paprika (if using), and red pepper flakes (if using). Whisk until well combined.
- Coat the scallops: Place the dried scallops into the butter mixture and gently toss to coat them evenly. Allow them to rest in the mixture for about 5 minutes so they can soak up the flavors.
The Broiling Process
- Arrange the scallops: Carefully remove the hot skillet or baking dish from the oven using oven mittens. Working quickly, arrange the scallops on the hot surface, leaving a little space between each one. Pour any remaining butter mixture over the scallops.
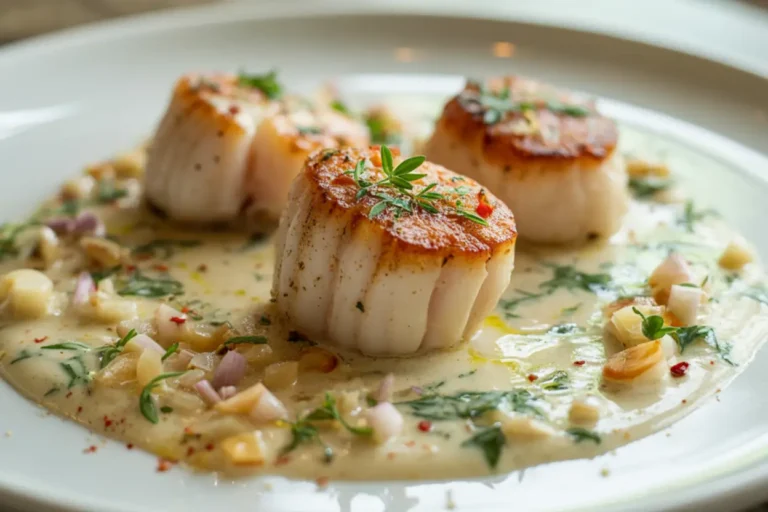
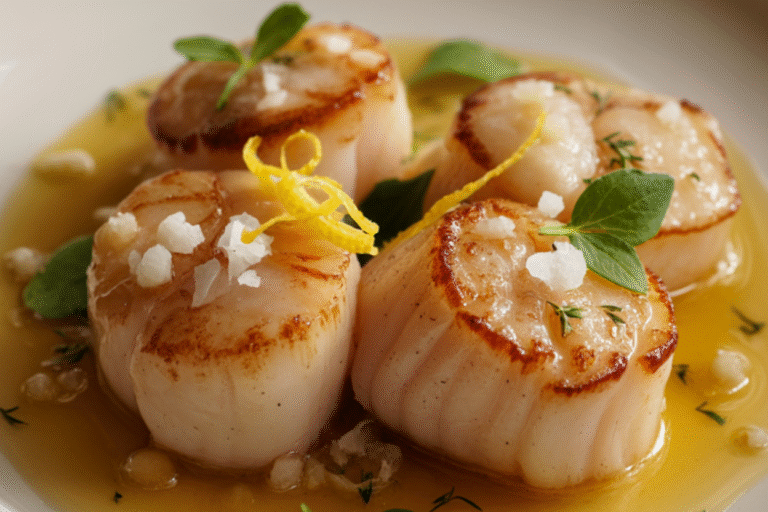
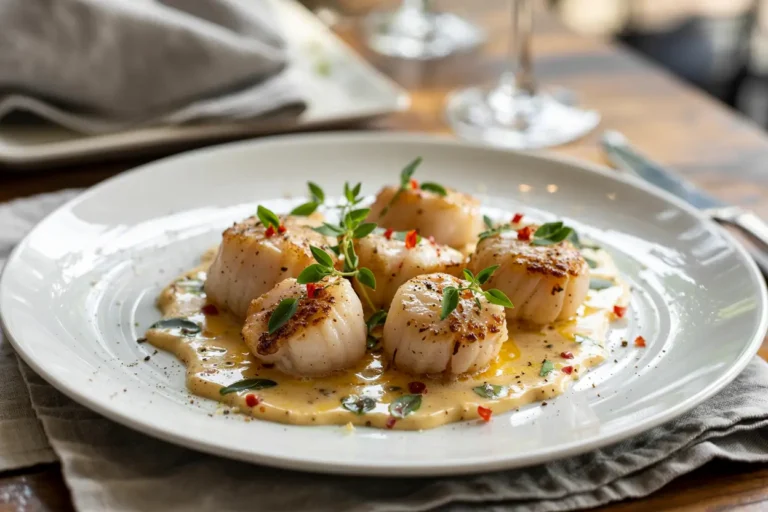
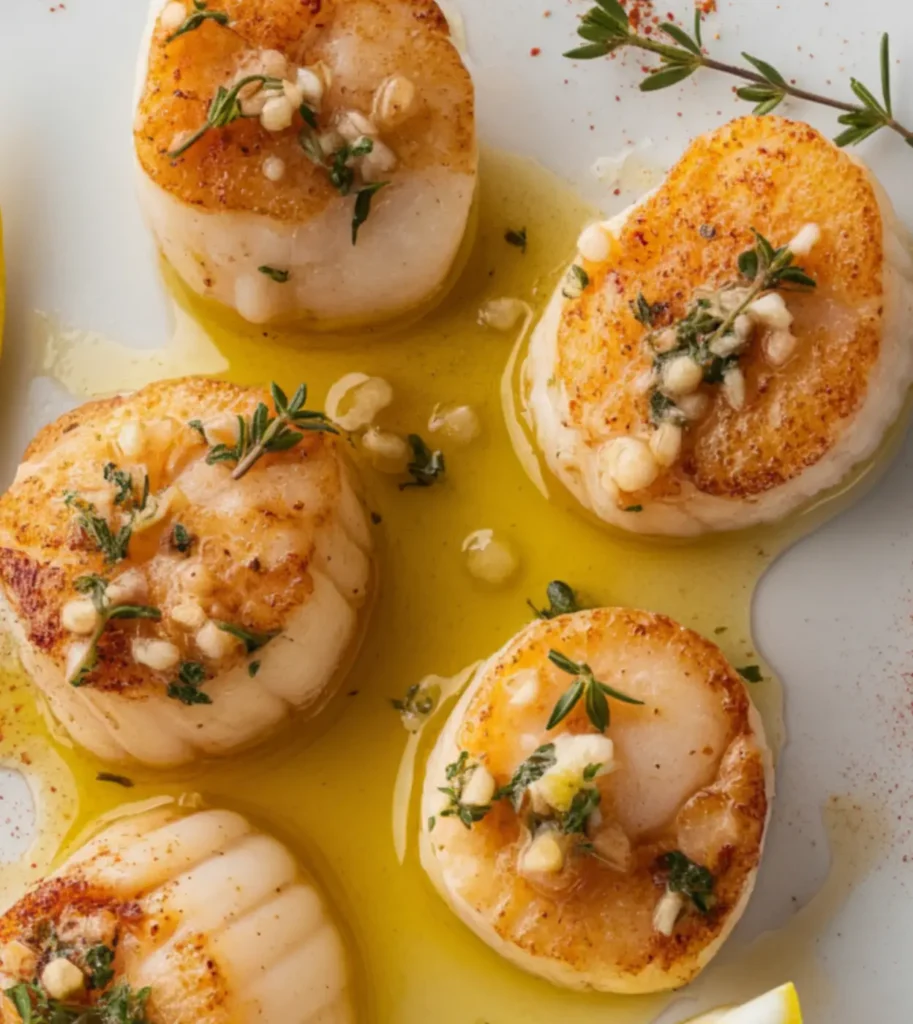
- Broil to perfection: Position the pan beneath the broiler and cook for 4–5 minutes if using smaller scallops, or 5–7 minutes for larger ones. You’re looking for a golden-brown crust on top with an opaque (not translucent) center. The scallops should be firm to the touch but still yield slightly when pressed – this indicates they’re perfectly cooked. Do not flip the scallops during broiling.
- Check for doneness: The telltale sign of perfectly cooked scallops is when they’ve turned from translucent to opaque and have a slight springiness when touched with a fork. If using an instant-read thermometer, the internal temperature should reach 115°F to 120°F for medium-rare or 125°F for medium.
Serving
- Rest briefly: Remove the scallops from the broiler and let them rest for 1 minute. This allows the juices to redistribute within the scallops, ensuring maximum tenderness and flavor.
- Garnish and serve: Transfer the scallops to serving plates, spooning any pan juices over them. Garnish with additional fresh parsley and serve immediately with lemon wedges for squeezing over the top.
What to Serve Broiled Scallops With
Broiled scallops make a stunning centerpiece for a meal when paired with complementary sides. Here are some elegant serving suggestions that highlight the scallops’ delicate flavor:
Starchy Sides:
- Creamy risotto, particularly lemon or saffron-infused variations
- Angel hair pasta tossed with olive oil, parsley, and a touch of the same garlic butter used for the scallops
- Crusty artisan bread for soaking up the delicious garlic butter sauce
- Creamy polenta with a touch of Parmesan cheese
Vegetable Accompaniments:
- Roasted asparagus spears with lemon zest
- Sautéed spinach with garlic and pine nuts
- A simple arugula salad with shaved Parmesan and a light lemon vinaigrette
- Green beans almondine
- Roasted Brussels sprouts with pancetta
Wine Pairings:
- A crisp Sauvignon Blanc or unoaked Chardonnay complements the sweetness of the scallops
- For something special, try a glass of Sancerre or Chablis
- If you favor red wine, choose a light-bodied Pinot Noir.
For a complete, elegant dinner menu, consider starting with a light soup like cucumber gazpacho in summer or a small portion of butternut squash soup in winter, followed by the scallops with one starch and one vegetable side, and finishing with a light dessert such as lemon sorbet or panna cotta.
Top Tips for Perfecting Broiled Scallops
After years of preparing broiled scallops for family and friends, I’ve gathered these professional insights to help you achieve scallop perfection:
Selecting the Best Scallops:
- Always look for “dry” scallops rather than “wet” scallops. Wet scallops have been treated with a phosphate solution that makes them absorb water and can prevent proper browning.
- Fresh scallops should have a sweet, clean ocean scent – never a strong fishy smell.
- Size matters: larger sea scallops (U-10 or U-12, meaning 10-12 per pound) are ideal for broiling, as they’re less likely to overcook.
Critical Preparation Steps:
- Temperature matters – bring scallops to room temperature for about 10 minutes before cooking for more even results.
- Drying is non-negotiable: use multiple paper towels if needed to get the scallops completely dry.
- Season just before cooking – applying salt too early can draw out moisture.
Broiling Technique:
- Watch the scallops like a hawk while broiling – the difference between perfectly caramelized and burnt can be less than a minute.
- If your broiler heats unevenly, rotate the pan halfway through cooking.
- Don’t be tempted to constantly open the oven to check – use the oven light instead.
Substitution Options:
- No fresh herbs? Use half the amount of dried herbs instead.
- Ghee makes an excellent substitute for butter if you’re avoiding dairy.
- For a dairy-free version, use all olive oil instead of the butter-oil combination.
- If you don’t have lemon, a splash of white wine or champagne vinegar can provide the necessary acidity.
Common Mistakes to Avoid:
- Overcrowding the pan: give each scallop room to develop a proper crust.
- Moving the scallops too soon: let them develop that golden crust undisturbed.
- Overcooking: Scallops continue cooking from residual heat, so remove them just as they turn opaque.
- Using low-quality scallops: this is one dish where quality truly matters.
Pro Secret: For an extra-rich flavor profile, add a tablespoon of good quality white wine to the butter mixture, and place a small piece of compound butter (butter mixed with herbs, lemon zest, and garlic) on top of each scallop for the last minute of broiling.
Storing and Reheating Tips
Scallops are best enjoyed immediately after cooking, but if you find yourself with leftovers:
Proper Storage:
- Allow leftover scallops to cool completely before refrigerating.
- Keep refrigerated in an airtight container and consume within 2 days.
- For best results, store the scallops separate from any sauce or juices to prevent them from becoming soggy.
Freezing Considerations:
- While possible, freezing cooked scallops isn’t ideal as they can become tough and lose their delicate texture.
- If freezing is necessary, wrap them tightly in plastic wrap and then place them in an airtight freezer bag, ensuring all air is removed.
- Frozen cooked scallops should be used within 1 month for best quality.
- Raw scallops freeze much better than cooked ones, so consider freezing before cooking if needed.
Reheating Methods:
- Gentle Stovetop Reheating (Preferred Method):
- Heat a non-stick pan over medium-low heat with a small amount of butter.
- Add the scallops and heat for about 1-2 minutes on each side until just warmed through.
- Be extremely careful not to overcook during reheating.
- Microwave Method (Quick but Less Ideal):
- Place scallops in a microwave-safe dish with a splash of water or butter.
- Cover with a damp paper towel.
- Heat on 50% power in 15-second intervals until just warm.
- Creative Leftover Ideas:
- Chop leftover scallops and add to a seafood pasta or risotto where the scallops won’t be the star of the dish.
- Add to a seafood salad with a light lemon dressing.
- Use in scallop tacos with avocado and a light slaw.
Remember that seafood, especially delicate varieties like scallops, is best enjoyed fresh. When planning your meal, I recommend cooking only what you expect to consume in one sitting for the optimal dining experience.
With these detailed instructions and professional tips at your disposal, you’re now equipped to create perfectly broiled scallops with that coveted golden crust that will impress even the most discerning seafood lovers. The combination of proper technique, quality ingredients, and attention to detail will transform this simple dish into an extraordinary culinary experience right in your own home.
click here to follow me on pinterest

Broiled Scallops Recipe: How to Get That Golden Crust
Cuisine: American / CoastalDifficulty: Easy4
servings10
minutes7
minutes220-250
kcalThese broiled scallops are buttery, garlicky, and perfectly golden on top — a fast and elegant seafood dish that’s packed with flavor. The combination of fresh herbs, zesty lemon, and a touch of heat elevates the natural sweetness of the scallops for a restaurant-quality meal in minutes.
Ingredients
1 pound (about 16-20) large sea scallops, preferably “dry” scallops
2 tablespoons unsalted butter, melted
2 tablespoons extra virgin olive oil
3 cloves garlic, finely minced
1 tablespoon fresh lemon juice
1 teaspoon lemon zest
2 tablespoons fresh parsley, finely chopped (plus extra for garnish)
1 tablespoon fresh thyme leaves (or 1 teaspoon dried)
½ teaspoon sea salt
¼ teaspoon freshly ground black pepper
¼ teaspoon paprika (optional, for color)
Pinch of red pepper flakes (optional, for heat)
Lemon wedges for serving
Instructions
- Prep the Scallops and Pan
Preheat your broiler on high and place a cast iron skillet or broiler-safe dish inside to heat for 5 minutes. Meanwhile, rinse the scallops under cold water, then pat them completely dry with paper towels. Remove any attached side muscles and, if needed, slice large scallops in half for even cooking. - Make the Butter Mixture
In a bowl, whisk together the melted butter, olive oil, minced garlic, lemon juice, lemon zest, parsley, thyme, salt, pepper, paprika (optional), and red pepper flakes (optional). Gently toss the scallops in this mixture and let them marinate for 5 minutes. - Broil the Scallops
Carefully remove the hot skillet from the oven and quickly arrange the scallops in a single layer, leaving space between each. Pour the remaining butter mixture over them. Broil for 4–5 minutes for smaller scallops or 5–7 minutes for larger ones, until golden on top and just opaque in the center. Do not flip them. - Serve and Garnish
Let the scallops rest for 1 minute after broiling. Transfer to plates, spoon over any pan juices, and garnish with extra parsley. Serve immediately with lemon wedges on the side.
Notes
- Using dry scallops (untreated and free of added water or chemicals) is essential for getting that beautiful golden crust. The fresh parsley, lemon zest, and optional chili flakes bring brightness and a subtle kick that balance the richness of the butter and olive oil. This dish pairs wonderfully with a crisp white wine or a light salad.