
Grilled Oysters with Garlic Butter Recipe: 5 Steps to Smoky Perfection
Table of Contents
Have you been intimidated by the thought of preparing oysters at home? I’m here to tell you that grilling these briny delicacies is not only manageable but also incredibly rewarding. My Grilled Oysters with Garlic Butter recipe transforms raw shellfish into smoky, savory bites of heaven that will transport you straight to the coast. Whether you’re a seafood aficionado or a curious beginner, this recipe will give you restaurant-quality results right in your backyard.
Thank you for reading this post, don't forget to subscribe!How to Make Grilled Oysters with Garlic Butter:
Quick Overview
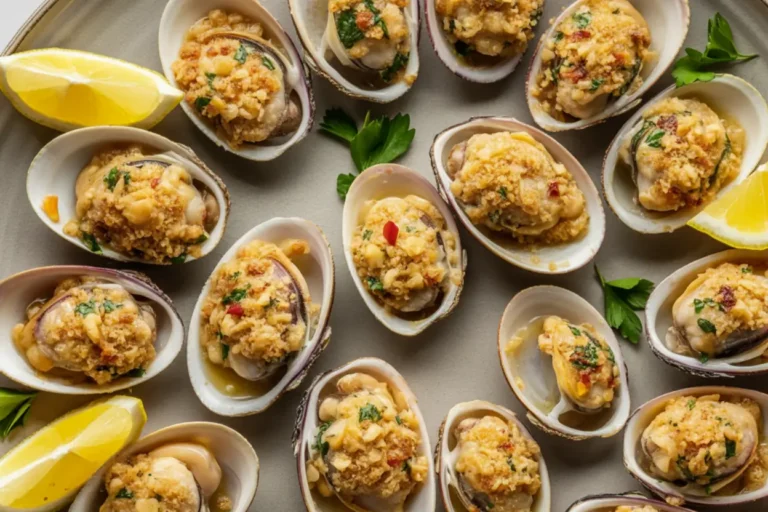
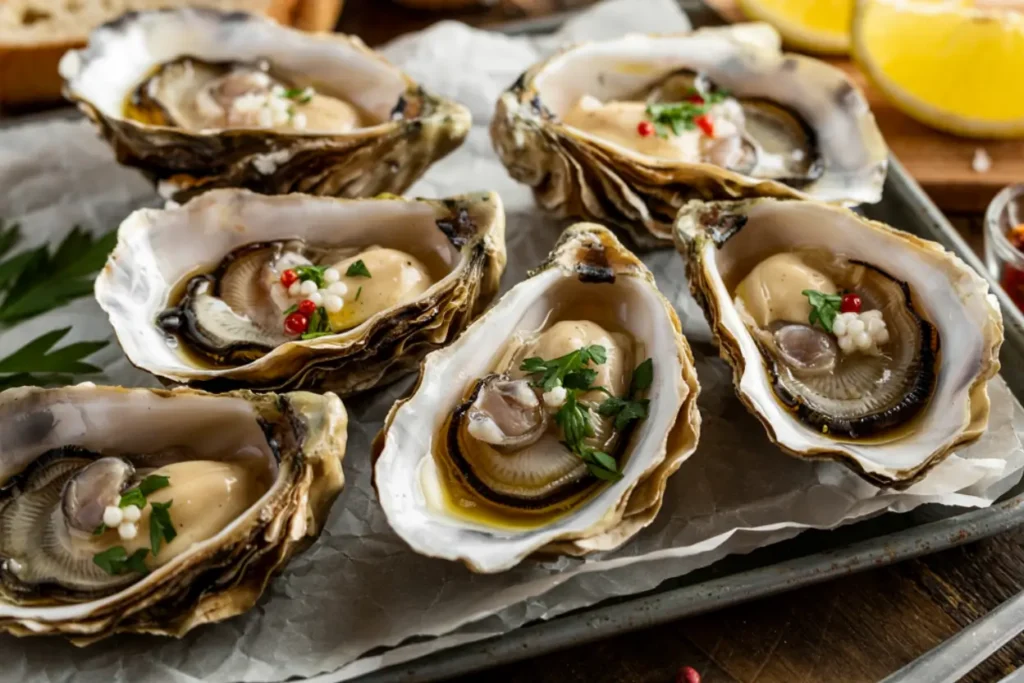
Grilled Oysters with Garlic Butter is the perfect dish for both casual gatherings and special occasions. What makes this recipe stand out is its beautiful simplicity—the smokiness from the grill enhances the natural briny flavor of the oysters while the rich, garlicky butter adds a luxurious dimension that complements rather than overwhelms. The oysters cook directly in their shells, creating natural serving vessels that capture all the delicious juices and melted butter.
This recipe requires minimal active preparation time (about 15 minutes) plus 5-7 minutes of grilling time, making it achievable even on busy weeknights. The most time-consuming aspect is shucking the oysters, but I’ll share some tips to make that process easier. The result is a smoky, buttery, utterly satisfying appetizer or main dish that looks far more impressive than the effort required to make it.
The Ingredients I Use to Bring My Grilled Oysters with Garlic Butter to Life
For the oysters:
- 24 fresh oysters, preferably medium to large size
- Rock salt or crumpled aluminum foil (for stabilizing oysters on the grill)
For the garlic butter:
- 8 tablespoons (1 stick) of unsalted butter, softened to room temperature
- 4 cloves garlic, finely minced (about 2 tablespoons)
- 2 tablespoons fresh parsley, finely chopped
- 1 tablespoon fresh lemon juice
- 1 teaspoon lemon zest
- 1 tablespoon shallot, finely minced (about 1 small shallot)
- ½ teaspoon red pepper flakes (adjust to taste)
- ¼ teaspoon freshly ground black pepper
- ¼ teaspoon kosher salt
For serving:
- Lemon wedges
- Additional chopped fresh parsley
- Hot sauce (optional)
- Crusty bread for soaking up the butter
Special equipment:
- Oyster knife or sturdy shucking knife
- Heavy-duty gloves or a kitchen towel for shucking
- Grill (gas or charcoal)
Step-by-Step Instructions
Step 1: Prepare the Garlic Butter Mixture
- In a medium bowl, mix together the softened butter, minced garlic, chopped parsley, lemon juice, lemon zest, minced shallot, red pepper flakes, black pepper, and salt.
- Using a fork or rubber spatula, mix all ingredients thoroughly until well combined. The butter should be soft enough to incorporate all ingredients evenly, but not melted.
- Taste and adjust seasonings if needed. Remember that oysters are naturally briny, so go easy on additional salt.
- Transfer the garlic butter to a small container and set aside. If prepared in advance, you can refrigerate the mixture, but bring it back to room temperature before using so it’s soft enough to spoon onto the oysters.
Step 2: Prepare Your Grill
- Preheat your grill to medium-high heat (around 400-450°F). Whether using charcoal or gas, you want a steady, even heat that’s not too intense.
- While the grill is heating, prepare a baking sheet or heatproof serving platter by spreading a thick layer of rock salt or crumpled aluminum foil. This will help stabilize the oysters and prevent them from tipping over when placed on the grill.
- If using a charcoal grill, arrange the coals for indirect heat cooking by pushing them to one side. This gives you a cooler zone where you can move oysters if they’re cooking too quickly.
Step 3: Shuck the Oysters
- While wearing protective gloves or holding the oyster with a folded kitchen towel, place the oyster cup-side down (flat side up) on a sturdy work surface.
- Insert the tip of the oyster knife into the hinge at the pointed end of the oyster. Apply gentle pressure while twisting the knife to pry the shell open.
- Once you feel the shell give way, slide the knife along the top shell to cut the muscle attachment. Remove the top shell while keeping as much of the oyster liquor (natural juice) in the bottom shell as possible.
- Run the knife under the oyster to detach it from the bottom shell, but leave it in place. This makes it easier to eat after grilling.
- Arrange the shucked oysters (in their bottom shells) on your prepared baking sheet with rock salt or foil. The salt or foil will keep them level and prevent the precious juices from spilling.
Step 4: Grill the Oysters
- Using a small spoon, place about 1 teaspoon of the prepared garlic butter mixture on top of each oyster. Be generous but don’t overwhelm the oyster—you want to complement its natural flavor.
- Carefully transfer the oysters to the preheated grill, placing them directly on the grates. If your grill grates have wide openings, consider using a grill-safe oyster rack or a sheet of heavy-duty foil with holes punched in it.
- Close the grill lid and cook for 5-7 minutes. The oysters are done when the edges begin to curl and the butter is bubbling. The oyster meat should be plump and opaque but still tender, not shriveled or tough.
- If some oysters are cooking faster than others, move them to a cooler part of the grill to prevent overcooking.
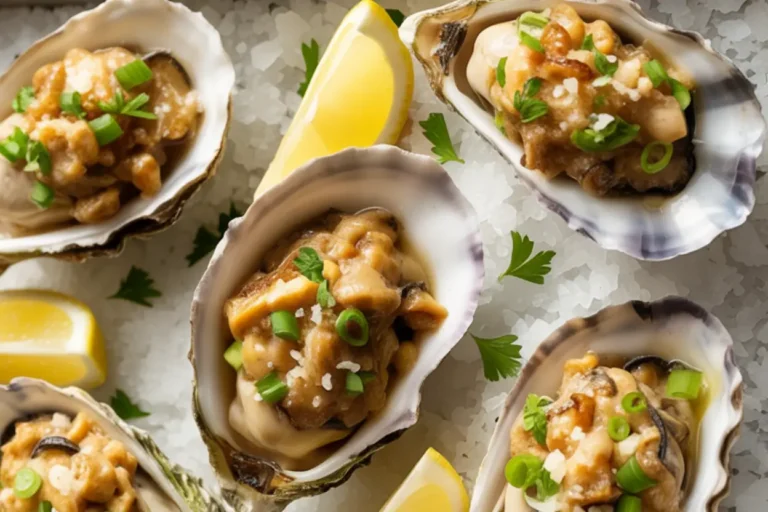
Step 5: Serve with Flair
- Using tongs or a heat-resistant glove, carefully remove the oysters from the grill and arrange them on a serving platter lined with more rock salt or crumpled foil to keep them stable.
- Garnish with additional chopped parsley and place lemon wedges around the platter.
- Serve immediately while still hot, with small forks or picks for guests to enjoy the oysters. Don’t forget to provide small bowls for empty shells and napkins for fingers.
- Offer crusty bread on the side to soak up the delicious garlic butter sauce that pools in the shells—it’s too good to waste!
What to Serve Grilled Oysters with Garlic Butter With
Grilled Oysters with Garlic Butter shine as either an impressive appetizer or a light main course. Here are some perfect pairings:
As an appetizer:
- Serve before a seafood pasta or grilled fish main course
- Serve alongside a fresh green salad tossed with a zesty lemon vinaigrette.
- Offer alongside other grilled seafood like shrimp or calamari for a mixed appetizer platter
As a main dish:
- Crusty sourdough or French bread for soaking up the buttery juices
- Classic coleslaw with a vinegar-based dressing to cut through the richness
- Grilled corn on the cob with herbs
- Simple roasted potatoes with rosemary
- A light cucumber and tomato salad
Beverage pairings:
- Crisp white wines: Sauvignon Blanc, unoaked Chardonnay, or Albariño
- Sparkling wines: Champagne or Prosecco
- Light beers: Pilsner or wheat beer
- For non-alcoholic options: Sparkling water with lemon or a cucumber-mint spritzer
Top Tips for Perfecting Grilled Oysters with Garlic Butter
Selecting Oysters:
- Buy oysters from a reputable fishmonger or seafood market. They should be alive, with shells that are tightly closed or that close when gently tapped.
- Choose medium to large oysters for grilling—they’re easier to handle and won’t overcook as quickly as smaller ones.
- Try to use oysters the same day you purchase them, but they can be stored for 1-2 days properly refrigerated (see storage tips below).
- Different oyster varieties have different flavor profiles. East Coast oysters tend to be saltier and brinier, while West Coast varieties are often creamier and sweeter. Both work well in this recipe.
Shucking Success:
- If you’re new to shucking, ask your fishmonger to demonstrate or watch an online tutorial before attempting.
- Invest in a proper oyster knife—a regular kitchen knife is more likely to slip and cause injury.
- Never force the knife with excessive pressure; instead, focus on finding the right spot at the hinge and applying controlled pressure.
- If an oyster is extremely difficult to open, it might not be fresh. When in doubt, discard it.
Grilling Guidance:
- Don’t preheat the grill too high—you want to cook the oysters gently, not char them.
- If using charcoal, wait until the flames die down and you have glowing embers before grilling.
- Watch carefully for the right moment to remove the oysters—they’re done when the edges just start to curl and the butter is bubbling, typically 5-7 minutes depending on their size.
- Consider using a grilling basket designed for seafood if you’re worried about oysters falling through the grates.
Flavor Variations:
- Add a tablespoon of white wine to the butter mixture for extra flavor
- Try different herb combinations: chives, thyme, or tarragon all work wonderfully
- Sprinkle with crispy bacon bits or pancetta before serving
- Add a dash of smoked paprika to the butter for enhanced smokiness
- For a special occasion, add a small spoonful of caviar on top of each grilled oyster
Storing and Reheating Tips
Storing Live Oysters:
- Live, unshucked oysters should be stored in the refrigerator at 32-40°F.
- Place them in a bowl with a damp towel over them (never in water and never in an airtight container, as they need to breathe).
- Position them with the cup side down (curved side down) so they retain their natural juices.
- Use within 1-2 days of purchase for optimal freshness and flavor.
Storing Leftovers:
- Ideally, grill only as many oysters as will be eaten immediately, as they’re best fresh off the grill.
- If you have leftover grilled oysters, remove them from their shells and store in an airtight container in the refrigerator for up to 24 hours.
- The garlic butter can be stored separately in the refrigerator for up to a week or frozen for up to a month.
Reheating Suggestions:
- Grilled oysters are best enjoyed fresh, but if you must reheat them:
- Gently warm them in a preheated 350°F oven for about 4-5 minutes until just heated through.
- Alternatively, place them under the broiler for 1-2 minutes, watching carefully to prevent overcooking.
- Avoid microwaving, as this will likely result in tough, rubbery oysters.
Freezing:
- I don’t recommend freezing grilled oysters, as the texture will significantly deteriorate.
- However, you can freeze the garlic butter mixture in an ice cube tray, then transfer the frozen cubes to a freezer bag for easy portioning in future recipes.
With these simple steps and helpful tips, you’ll be grilling oysters like a seaside pro in no time. The combination of smoky char, briny oysters, and rich garlic butter creates an irresistible flavor that’s sure to impress any dinner guest. Don’t be surprised if this becomes your new go-to dish for entertaining or special date nights at home!
click here to follow on pinterest
Grilled Oysters with Garlic Butter Recipe: 5 Steps to Smoky Perfection
Cuisine: AmericanDifficulty: Moderate4-6
servings20
minutes7
minutes150-170
kcalThis crowd-pleasing appetizer features fresh oysters grilled on the half shell and topped with a rich garlic-herb butter. As they grill, the butter melts into the oysters, creating a savory, aromatic sauce that’s perfect for dipping with crusty bread.
Ingredients
24 fresh oysters, preferably medium to large size
Rock salt or crumpled aluminum foil (for stabilizing oysters on the grill)
8 tablespoons (1 stick) of unsalted butter, softened to room temperature
4 cloves garlic, finely minced (about 2 tablespoons)
2 tablespoons fresh parsley, finely chopped
1 tablespoon fresh lemon juice
1 teaspoon lemon zest
1 tablespoon shallot, finely minced (about 1 small shallot)
½ teaspoon red pepper flakes (adjust to taste)
¼ teaspoon freshly ground black pepper
¼ teaspoon kosher salt
Lemon wedges
Additional chopped fresh parsley
Hot sauce (optional)
Crusty bread for soaking up the butter
Instructions
- Make the Garlic Butter
Mix softened butter with garlic, parsley, lemon juice & zest, shallot, red pepper flakes, salt, and pepper until well combined. Taste and adjust the seasoning (light on salt). Set aside at room temperature. - Heat the Grill & Prep the Tray
Preheat your grill to 400–450°F (medium-high). Line a baking sheet or grill-safe platter with rock salt or crumpled foil to keep oysters stable. For charcoal grills, create an indirect heat zone. - Shuck the Oysters
Carefully open oysters with an oyster knife, keeping the juice in the bottom shell. Detach the oyster from the shell, then place each on your prepared tray. - Grill with Garlic Butter
Spoon about 1 tsp of garlic butter onto each oyster. Grill directly on grates for 5–7 minutes, covered, until the edges curl and the butter bubbles. Move oysters to a cooler spot if they cook too quickly. - Garnish & Serve
Remove from the grill and garnish with fresh parsley and lemon wedges. Serve hot with crusty bread for soaking up the buttery goodness. Optional: Add a dash of hot sauce for extra kick.
Notes
- Grilling oysters is a foolproof way to enjoy them, even if you’re not a fan of raw shellfish. The garlic butter adds richness, while the lemon and parsley keep it bright and fresh. Using rock salt or crumpled foil helps keep the oysters level on the grill, preventing that precious butter from spilling out. Serve with crusty bread to soak up every drop!