Pan-Seared Scallops: How to Get Restaurant-Style Results
Table of Contents
There are few culinary achievements more satisfying than mastering the perfect pan-seared scallops – those caramelized, golden-brown exteriors giving way to tender, sweet centers that seem to melt in your mouth. If you’ve ever ordered this delicacy at a high-end restaurant and wondered if you could recreate that magic at home, I’m here to tell you that not only is it possible, it’s surprisingly straightforward with the right technique.
Thank you for reading this post, don't forget to subscribe!After years of perfecting my approach to pan-seared scallops (and admittedly, working through some early failures), I’ve distilled the process down to a foolproof method that delivers restaurant-quality results every time. The secret lies not in complicated techniques or exotic ingredients, but in understanding a few key principles that professional chefs rely on. In this guide, I’ll walk you through everything you need to know – from selecting the perfect scallops to achieving that coveted golden crust – so you can confidently serve this impressive dish at your next dinner gathering or special meal at home.
How to Make Pan-Seared Scallops
Quick Overview
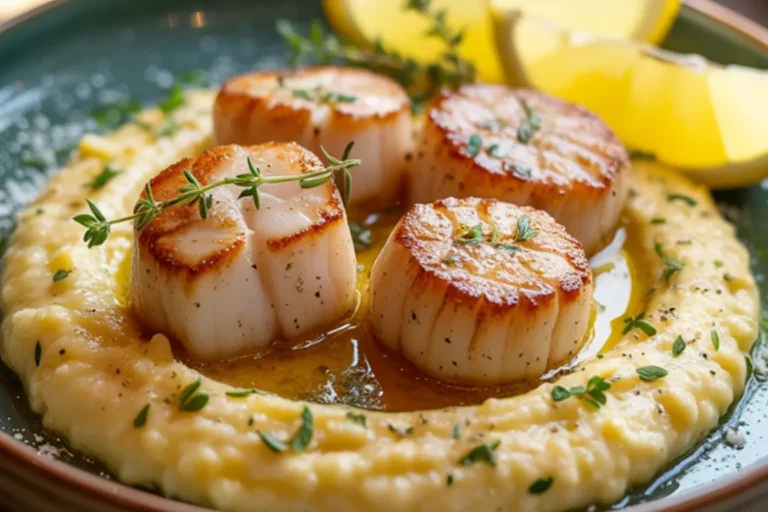
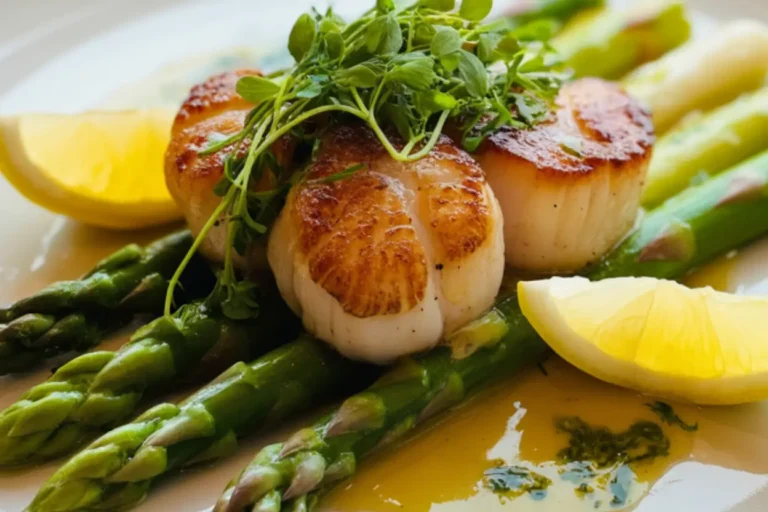
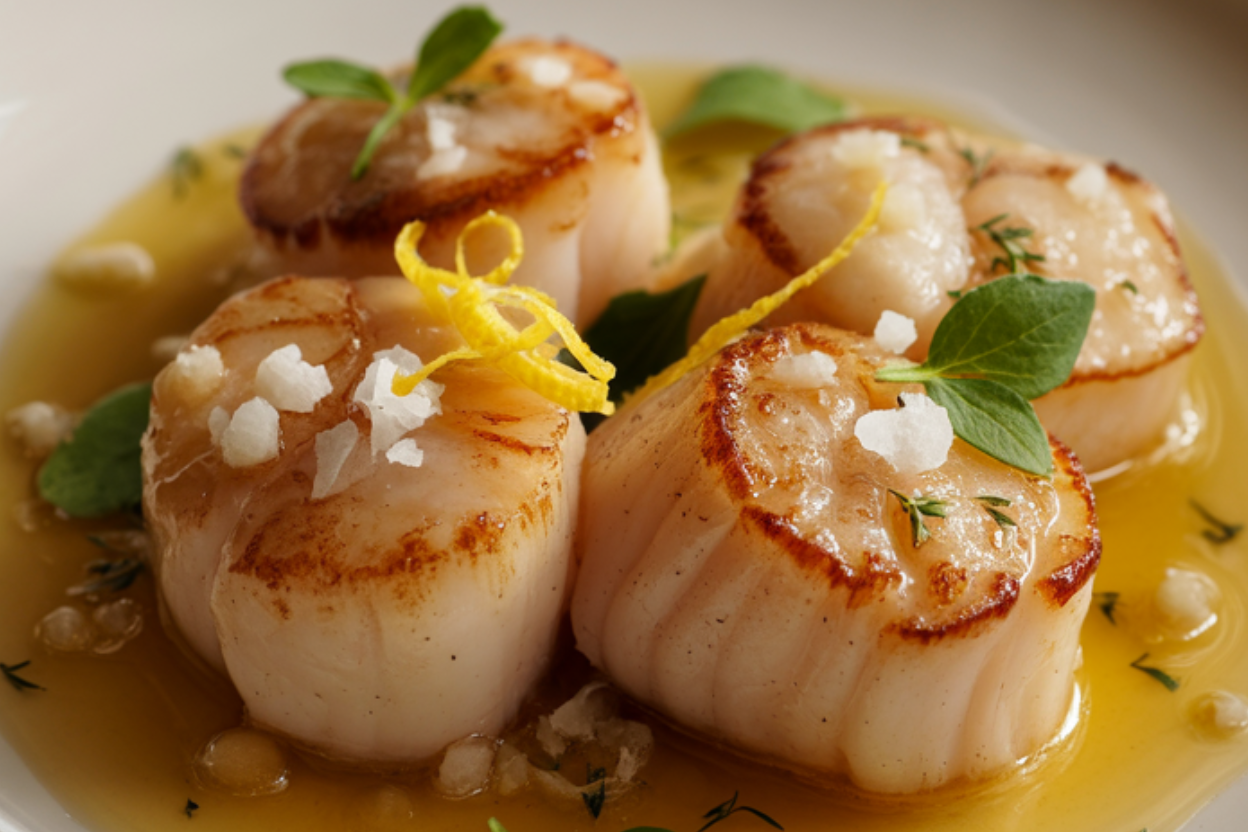
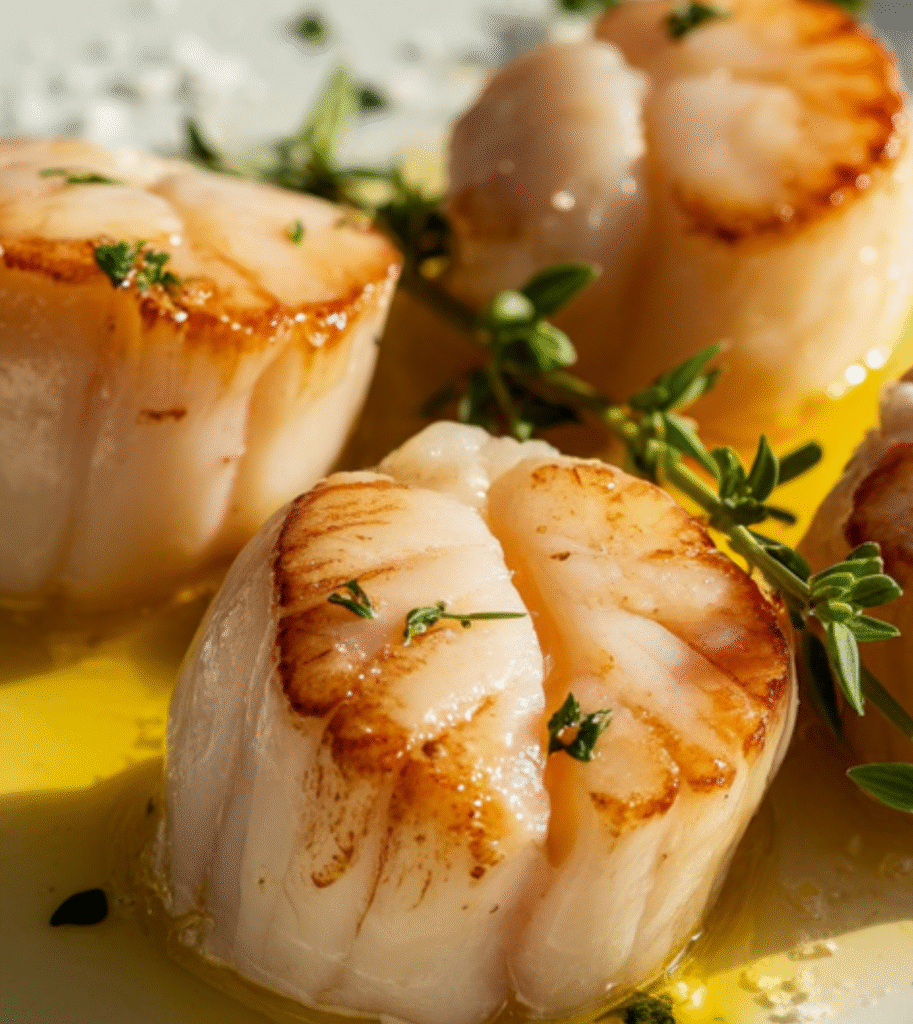
Pan-seared scallops offer the perfect combination of elegant presentation and straightforward preparation, creating a dish that looks and tastes like it came from a fine dining kitchen. What makes this dish special is the beautiful contrast between the caramelized, golden-brown exterior and the tender, sweet interior that practically melts in your mouth. The natural sweetness of fresh scallops is enhanced by the Maillard reaction during searing, creating complex flavors that need little embellishment beyond a simple butter basting with aromatics and a bright finish of lemon.
One of the most appealing aspects of this recipe is its remarkable efficiency – from start to finish, you’re looking at just about 15 minutes of active cooking time. The preparation is minimal, the cooking process is quick, and the results are nothing short of spectacular. The entire dish requires just a handful of quality ingredients and relies more on proper technique than complicated components. This combination of simplicity and impressive results makes pan-seared scallops perfect for both special occasions and those evenings when you want to elevate an ordinary meal into something extraordinary without spending hours in the kitchen.
The Ingredients I Use to Bring My Pan-Seared Scallops to Life
For the scallops:
- 1 pound (about 12-16) large sea scallops, ideally “dry-packed”
- 2 tablespoons of neutral oil with a high smoke point (such as grapeseed, avocado, or clarified butter)
- Kosher salt
- Freshly ground black pepper
For the butter basting (optional but recommended):
- 2 tablespoons unsalted butter
- 2 cloves garlic, lightly crushed
- 2 sprigs fresh thyme
- 1 small sprig of rosemary
For finishing:
- 1 tablespoon fresh lemon juice
- 1 teaspoon lemon zest
- 1 tablespoon fresh parsley, finely chopped
- Flaky sea salt (such as Maldon) for serving
Step-by-Step Instructions
Step 1: Prepare the Scallops
- Examine your scallops carefully. Remove the small side muscle (a rectangular piece that feels tougher than the rest of the scallop) if it’s still attached. This muscle is edible but can be tough when cooked.
- Place the scallops on a plate lined with several layers of paper towels. Cover them with additional paper towels and press gently to absorb excess moisture. This step is absolutely crucial for achieving a good score.
- Allow the scallops to sit at room temperature for 10-15 minutes before cooking. Cold scallops will not sear properly, as they’ll drop the pan temperature too quickly when added.
- Just before cooking, pat the scallops dry once more with fresh paper towels. They should feel tacky to the touch rather than wet.
- Generously season both sides of the scallops with kosher salt and freshly ground black pepper right before cooking. Avoid salting too early, as it can draw out moisture.
Step 2: Prepare Your Pan and Oil
- Choose a heavy-bottomed skillet, preferably cast iron or stainless steel. These materials retain and distribute heat evenly, which is essential for a perfect sear. Avoid non-stick pans as they typically don’t get hot enough for a proper sear.
- Preheat your pan over medium-high heat for 3-4 minutes, ensuring it becomes very hot but not smoking.
- Add the neutral oil to the hot pan. Use enough to coat the bottom of the pan with a thin layer, approximately 2 tablespoons for a 12-inch skillet.
- Wait until the oil is shimmering and moves quickly across the pan when tilted – this indicates it’s properly heated.
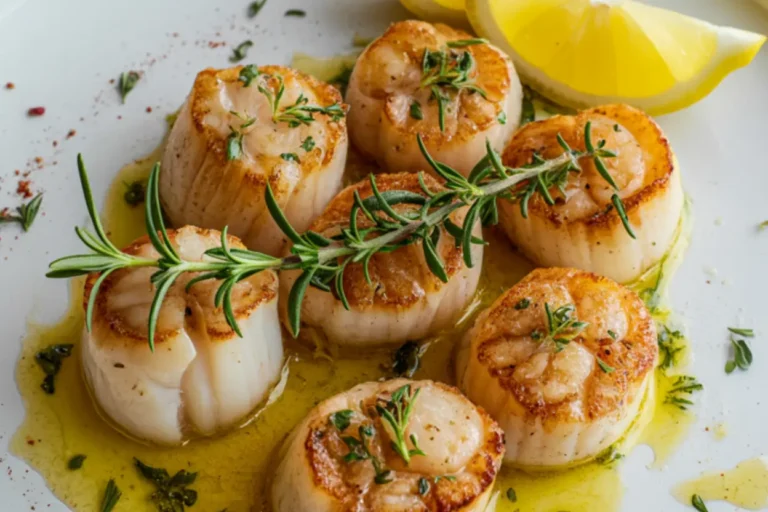
Step 3: Sear the Scallops
- Carefully place the seasoned scallops in the hot pan, leaving at least 1 inch between each scallop. Overcrowding will cause the pan temperature to drop and the scallops to steam rather than sear. Work in batches if necessary.
- Once placed in the pan, do not move the scallops for at least 1.5-2 minutes. This allows the crust to develop properly. Resist the urge to peek or shift them!
- When the bottoms have developed a rich golden-brown crust (you can gently lift one slightly with tongs to check), flip each scallop carefully using tongs or a thin spatula.
- Cook for an additional 1-1.5 minutes on the second side, until it also develops a golden crust. The sides of the scallops should have turned from translucent to opaque about halfway up.
Step 4: Butter Basting (Optional but Recommended)
- After flipping the scallops, reduce the heat slightly to medium.
- Add the butter, crushed garlic cloves, and herb sprigs to the pan, placing them between the scallops.
- Once the butter has melted and begun to foam, carefully tilt the pan slightly and use a spoon to collect the butter mixture.
- Baste the scallops with the flavored butter for about 30 seconds, allowing the butter to enhance the flavor and help the scallops cook through gently.
Step 5: Remove and Finish the Dish
- The scallops are ready when they are slightly firm to the touch but still have a bit of give when pressed gently. They should be opaque on the outside with a slight translucency in the center, indicating they are not overcooked. The entire cooking process should take no longer than 4-5 minutes.
- Immediately transfer the scallops to a serving plate to prevent them from continuing to cook in the residual heat of the pan.
- Drizzle the scallops with fresh lemon juice and sprinkle with lemon zest and chopped parsley.
- Add a final touch of flaky sea salt to enhance the flavors and provide a subtle textural contrast.
- Serve immediately while hot for the best taste and texture experience.
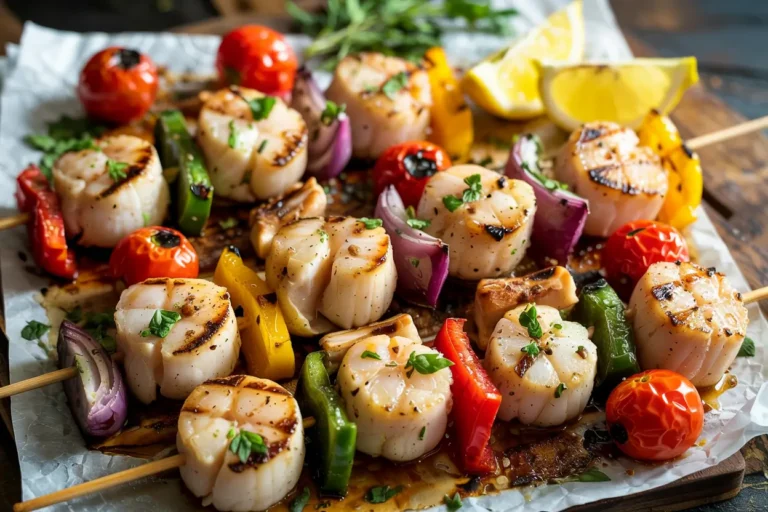
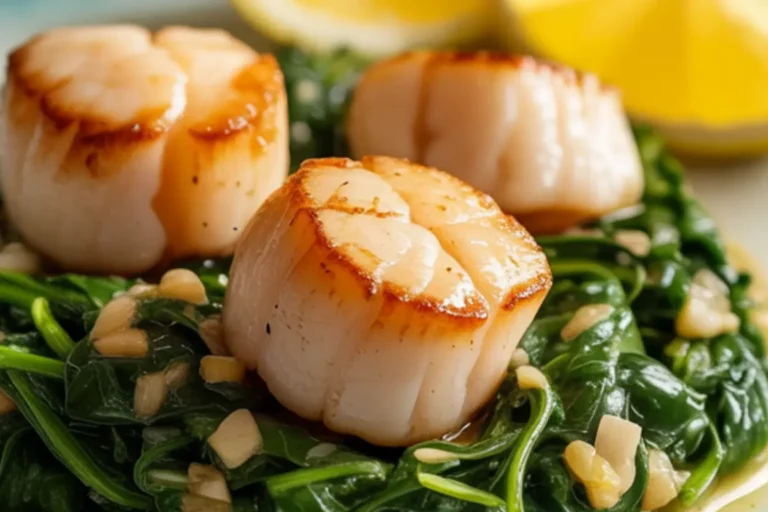
What to Serve Pan-Seared Scallops With
Pan-seared scallops are versatile and can pair beautifully with various accompaniments:
Starch options:
- Creamy risotto, particularly lemon or saffron varieties
- Buttery mashed potatoes with roasted garlic
- Polenta with Parmesan and herbs
- Crusty artisan bread for sopping up any buttery juices
- Angel hair pasta lightly tossed in olive oil and herbs.
Vegetable companions:
- Asparagus spears, simply roasted or grilled
- Wilted spinach with garlic
- Roasted Brussels sprouts with pancetta
- Sautéed French green beans with shallots
- A mint-infused pea puree for a refreshing, spring-inspired accompaniment.
Sauce pairings:
- Brown butter with capers and lemon
- Light champagne beurre blanc
- Simple herb oil drizzle (basil, parsley, or chives)
- Citrus beurre blanc
- Subtle saffron cream sauce
Wine recommendations:
- Unoaked Chardonnay
- Crisp Sauvignon Blanc
- Dry Chenin Blanc
- Albariño
- Dry sparkling wine or Champagne
Complete the meal with:
- A simple green salad with light vinaigrette as a starter
- Chilled cucumber soup in summer
- Fresh fruit sorbet or lemon granita for a palate-cleansing dessert
- Crème brûlée or panna cotta for an elegant finale
Top Tips for Perfecting Pan-Seared Scallops
- Select the right scallops: Always look for “dry-packed” scallops rather than “wet-packed” ones. Wet-packed scallops are treated with a solution that helps preserve them but makes achieving a good sear nearly impossible. Dry-packed scallops have a natural ivory or slightly pinkish hue, while wet-packed ones appear unnaturally white. When in doubt, ask your fishmonger for dry-packed scallops specifically.
- Master moisture management: The single most important factor in achieving a proper seal is controlling moisture. Beyond the initial paper towel patting, place your scallops on a wire rack in the refrigerator for 30 minutes before cooking to allow air circulation around them, further drying their surfaces. Also, never rinse scallops before cooking – just carefully inspect and clean them if needed.
- Understand proper doneness: Scallops cook very quickly and continue cooking from residual heat after being removed from the pan. For perfect doneness, look for the sides to be opaque about ¾ of the way up, with a slight translucency remaining in the center. When gently pressed, they should feel like the flesh between your thumb and forefinger when you make a relaxed “OK” sign – slightly resistant but not firm.
- Pan selection matters: Cast iron pans deliver the best sear due to their excellent heat retention, but stainless steel also works well. Whatever you choose, the pan must be thoroughly heated before adding the oil and scallops. To test if your pan is hot enough, add a drop of water – it should sizzle and evaporate almost immediately.
- Oil temperature indicators: The oil should shimmer and move quickly around the pan when tilted before adding the scallops. If you see even the faintest whisp of smoke, the pan is ready (but don’t let it start smoking heavily, which indicates it’s too hot).
- Timing adjustments for different sizes:
- Jumbo scallops (U-10, meaning under 10 per pound): 2-2.5 minutes per side
- Large scallops (U-15): 1.5-2 minutes per side
- Medium scallops (15-20 per pound): 1-1.5 minutes per side. Always use visual cues along with timing – the golden-brown crust is your primary indicator.
- Troubleshooting common issues:
- Scallops sticking to the pan: Your pan wasn’t hot enough before adding the scallops, or the scallops were too wet
- No browning: Usually indicates wet scallops or insufficient heat
- Rubbery texture: Almost always a sign of overcooking – remember that carryover cooking continues after removal from heat
- Undercooked centers: Remove larger scallops from the refrigerator 30 minutes before cooking to ensure even cooking from edge to center
Storing and Reheating Tips
Pan-seared scallops are truly at their best when served immediately after cooking, but if you find yourself with leftovers, here’s how to handle them:
Short-term storage:
- Allow the scallops to cool completely before refrigerating
- Store in an airtight container, lined with a paper towel to absorb excess moisture
- Keep refrigerated for no more than 1-2 days
- The beautiful crust will, unfortunately, soften during storage, but the flavor will remain good
Freezing guidance (not ideal but possible):
- It’s best to freeze raw scallops rather than cooked ones
- If you must freeze cooked scallops, wrap them individually in plastic wrap, then place in a freezer-safe container
- Use within 1 month
- Expect significant textural changes after freezing and thawing
Reheating methods:
For best results:
- Gentle reheating is essential to prevent the scallops from becoming tough
- Place the scallops on a microwave-safe plate
- Cover with a damp paper towel
- Microwave at 50% power in 15-second intervals until just warmed through
- Stop as soon as they’re warmed to prevent a rubbery texture
Alternative approach:
- For a better texture, consider serving leftover scallops cold or at room temperature in a seafood salad rather than reheating
- Let them rest at room temperature for 15-20 minutes before serving.
Creative uses for leftover scallops:
- Chop and add to pasta with a light cream sauce
- Use in seafood fried rice
- Add to a seafood chowder
- Flake apart and use in scallop cakes similar to crab cakes
- Create a seafood salad with a light lemon vinaigrette
Quality check before consuming:
- Leftover scallops should have a fresh, oceanic scent, not a fishy or ammonia-like odor.
- If there’s any question about the smell or appearance, err on the side of caution and discard them
Mastering pan-seared scallops is one of those culinary skills that delivers impressive results with relatively little effort once you understand the key principles. The contrast of that caramelized exterior against the sweet, tender interior creates a luxurious eating experience that rivals what you’d find in fine dining establishments.
Remember that the simplicity of this dish means that each element matters significantly – the quality of your scallops, the proper heat of your pan, and the careful monitoring of cooking time all play crucial roles in the final result. By following the techniques outlined in this guide, you’ll be able to achieve restaurant-quality pan-seared scallops in your own kitchen, impressing dinner guests or simply treating yourself to an elegant meal that celebrates the natural beauty of this remarkable seafood.
Whether served as an impressive appetizer or as the star of a special dinner, perfectly pan-seared scallops represent one of the most satisfying achievements in home cooking – a dish where technique and quality ingredients come together to create something truly greater than the sum of its parts.
click here to follow me on pinterest

Pan-Seared Scallops: How to Get Restaurant-Style Results
Cuisine: AmericanDifficulty: Easy2-4
servings10
minutes7
minutes200-250
kcalPan-seared scallops are a delicate and flavorful seafood dish that’s quick and easy to make. This recipe uses “dry-packed” sea scallops, meaning they’re free from added moisture and perfect for getting that ideal golden-brown crust. The scallops are seared in neutral oil and butter, then infused with garlic, fresh thyme, and rosemary. A touch of lemon juice and zest adds brightness, while a sprinkle of flaky sea salt elevates the dish for a restaurant-quality experience at home.
Ingredients
1 pound (about 12-16) large sea scallops, ideally “dry-packed”
2 tablespoons of neutral oil with a high smoke point (such as grapeseed, avocado, or clarified butter)
Kosher salt
Freshly ground black pepper
2 tablespoons unsalted butter
2 cloves garlic, lightly crushed
2 sprigs fresh thyme
1 small sprig of rosemary
1 tablespoon fresh lemon juice
1 teaspoon lemon zest
1 tablespoon fresh parsley, finely chopped
Flaky sea salt (such as Maldon) for serving
Instructions
- Prepare the Scallops
Remove the small side muscle from the scallops, if still attached. Pat the scallops dry with paper towels, pressing gently to absorb moisture. Let them sit at room temperature for 10-15 minutes. Just before cooking, pat them dry again and season generously with kosher salt and freshly ground black pepper. - Prepare the Pan and Oil
Choose a heavy-bottomed skillet, preferably cast iron or stainless steel, and preheat it over medium-high heat for 3-4 minutes. Add about 2 tablespoons of neutral oil, ensuring it coats the bottom of the pan. Wait until the oil shimmers and moves easily when tilted. - Sear the Scallops
Carefully place the scallops in the hot pan, ensuring they’re not crowded. Let them sear undisturbed for 1.5-2 minutes until a golden-brown crust forms. Flip the scallops and cook for another 1-1.5 minutes until golden and opaque halfway up the sides. - Butter Basting (Optional)
Reduce heat to medium, then add butter, crushed garlic cloves, and herb sprigs to the pan. Once the butter foams, tilt the pan and use a spoon to baste the scallops with the flavorful butter for 30 seconds. - Remove and Finish the Dish
Once the scallops are firm but still slightly translucent in the center (4-5 minutes total), transfer them to a plate. Drizzle with fresh lemon juice, sprinkle with lemon zest and chopped parsley, and finish with a touch of flaky sea salt. Serve immediately.
Notes
- When preparing scallops, it’s important to use “dry-packed” scallops, as they contain less moisture and will sear better. The high heat of the pan is essential for achieving that crisp, caramelized exterior while keeping the interior tender and slightly translucent. This dish pairs wonderfully with light sides like angel hair pasta, pea puree, or a fresh salad. Remember to serve immediately for the best texture and flavor!