
Stuffed Clam: 7 Secrets to Perfect Seafood Bites
Table of Contents
There’s something irresistibly nostalgic about a perfectly executed stuffed clam. Also known as “stuffies” in New England, these savory seafood treats strike the ideal balance between the briny sweetness of fresh clams and the satisfying heartiness of a well-seasoned bread stuffing. After years of testing and refining my technique, I’m excited to share my definitive recipe for creating restaurant-quality stuffed clams at home, along with the seven crucial secrets that separate mediocre attempts from truly memorable results.
Thank you for reading this post, don't forget to subscribe!Whether you’re planning a special dinner, looking for an impressive appetizer for guests, or simply craving a taste of the coast, these stuffed clams deliver big flavors with techniques that are accessible to home cooks of any skill level. Let’s dive into everything you need to know to master this classic seafood dish that’s been delighting diners for generations.
How to Make Stuffed Clam
Quick Overview
Stuffed clams represent comfort food at its finest—satisfying, flavorful, and deceptively straightforward to prepare. What makes this recipe particularly special is how it transforms humble ingredients into something truly memorable. The natural brininess of fresh clams permeates the entire dish, while the stuffing provides a perfectly seasoned canvas that enhances rather than masks the seafood flavor.
The beauty of this recipe lies in its textural contrast: the tender chopped clams folded into a stuffing that’s crisp on top yet moist within. Each bite delivers a perfect balance of seafood sweetness, herbal notes, and subtle heat from the red pepper flakes. A hint of lemon brightens everything, cutting through the richness and enhancing the ocean-fresh flavor.
Despite their impressive appearance, stuffed clams are surprisingly approachable for home cooks. While the recipe involves several steps, none are technically challenging, and many components can be prepared in advance. The most time-consuming aspect is simply opening the clams, but even that becomes easier with practice. The result is a versatile dish that works equally well as an elegant appetizer, a satisfying main course when paired with sides, or even as part of a seafood buffet.
The Ingredients I Use to Bring My Stuffed Clam to Life
For the Clams and Broth:
- 18 large quahog or cherrystone clams (about 4-5 pounds), scrubbed clean
- 1 cup water
- 1 bay leaf
- 1 sprig fresh thyme
For the Stuffing Base:
- 4 tablespoons unsalted butter
- 1 medium yellow onion, finely diced (about 1 cup)
- 2 stalks celery, finely diced (about ½ cup)
- 1 medium red bell pepper, finely diced (about ½ cup)
- 4 cloves garlic, minced
- ¼ teaspoon red pepper flakes (adjust to taste)
- 1 teaspoon dried oregano
- 1 tablespoon fresh thyme leaves, chopped (or 1 teaspoon dried)
- 2 tablespoons fresh parsley, chopped, plus extra for garnish
For the Stuffing Mixture:
- 3 cups fresh breadcrumbs (from about 6-8 slices day-old Italian or French bread)
- ½ cup grated Parmesan cheese
- 2 tablespoons olive oil, plus more for drizzling
- 1 tablespoon lemon zest (from 1 lemon)
- 2 tablespoons fresh lemon juice
- 2 large eggs, lightly beaten
- ½ teaspoon kosher salt (adjust to taste, as clam broth is naturally salty)
- ½ teaspoon freshly ground black pepper
For Garnish:
- Lemon wedges
- Additional chopped fresh parsley
- Hot sauce (optional, for serving)
Step-by-Step Instructions
Step 1: Prepare and Steam the Clams
- Begin by thoroughly scrubbing the clams under cold running water, using a stiff brush to remove any sand or debris. Pay special attention to the hinge area and the seam where the shells meet.
- In a large pot or Dutch oven, combine 1 cup of water with the bay leaf and thyme sprig. Bring to a simmer over medium heat.
- Add the cleaned clams to the pot, cover it, and steam them until they just begin to open—this usually takes 5 to 10 minutes. Keep a close eye on them and use tongs to remove each clam as it opens, placing them in a large bowl. If any clams stay closed after 15 minutes, discard them.
- Once all clams have been removed, strain the cooking liquid through a fine-mesh sieve lined with cheesecloth or a coffee filter to remove any grit or sand. Reserve this flavorful clam broth for the stuffing.
- Allow the clams to cool until you can handle them comfortably, about 5-10 minutes.
Step 2: Prepare the Clam Meat and Shells
- Working over a bowl to catch any juices, separate the clam meat from the shells by gently pulling it away. Save both the meat and shells.
- Inspect the shells and select the 12 best halves (the deepest ones work best for stuffing). Rinse these chosen shells well and set aside to dry.
- Finely chop the clam meat and set aside in a bowl. Cover and refrigerate until needed.
Step 3: Create the Aromatic Stuffing Base
- Preheat your oven to 375°F (190°C).
- Melt the butter in a large skillet over medium heat. Add the diced onion, celery, and red bell pepper, and cook for 5 to 7 minutes, stirring occasionally, until the vegetables are tender but not browned.
- Add the minced garlic, red pepper flakes, dried oregano, fresh thyme, and 1 tablespoon of chopped parsley. Cook for another 1-2 minutes until fragrant, stirring frequently to prevent the garlic from burning.
- Remove the skillet from heat and allow the mixture to cool slightly, about 5 minutes.
Step 4: Combine the Stuffing Mixture
- In a large mixing bowl, combine the fresh breadcrumbs, grated Parmesan cheese, olive oil, lemon zest, and cooled vegetable mixture.
- Add ¾ cup of the reserved clam broth, lemon juice, and beaten eggs to the bowl. Mix until the stuffing is evenly moistened but not soggy. The mixture should be slightly loose but hold its shape when gently pressed together.
- Gently fold in the chopped clam meat, remaining parsley, salt, and black pepper. Mix until just combined, being careful not to overmix.
- If the stuffing seems too dry, add a bit more clam broth, 1 tablespoon at a time. Conversely, if it’s too wet, add more breadcrumbs as needed. The mixture should be moist enough to stick together, but not so wet that it feels soggy.
Step 5: Stuff and Bake the Clams
- Arrange the cleaned clam shell halves on a baking sheet. If they wobble, create a small bed of kosher salt or crumpled aluminum foil on the baking sheet to stabilize them.
- Generously mound the stuffing mixture into each shell, dividing it evenly among the 12 shells. Press the stuffing lightly to compact it, but don’t press too firmly.
- Drizzle a small amount of olive oil over the top of each stuffed clam to promote browning.
- Bake in the preheated oven for 20-25 minutes, until the tops are golden brown and crispy.
- For an extra-crispy top, switch the oven to broil for the final 2 minutes, watching carefully to prevent burning.
- Remove from the oven and allow to cool slightly for 3-5 minutes before serving.
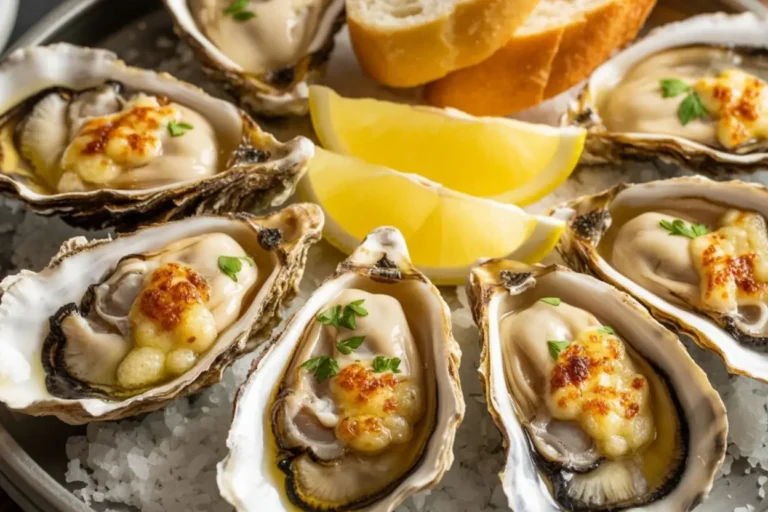
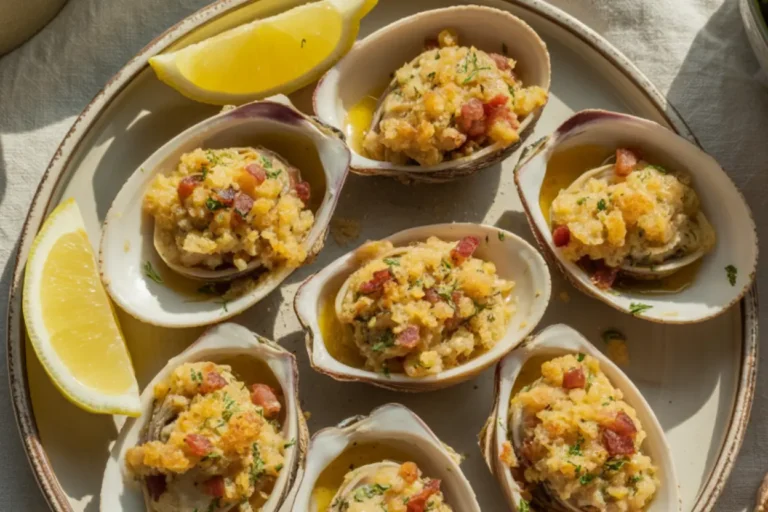
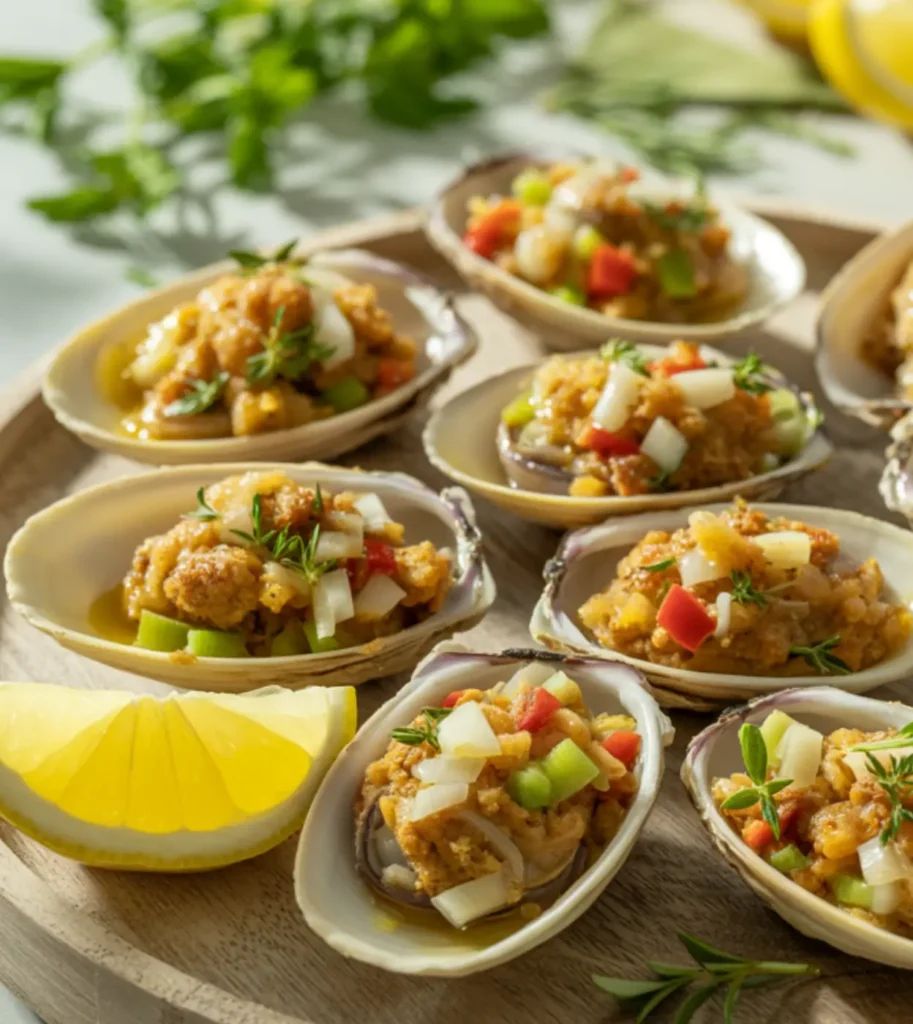
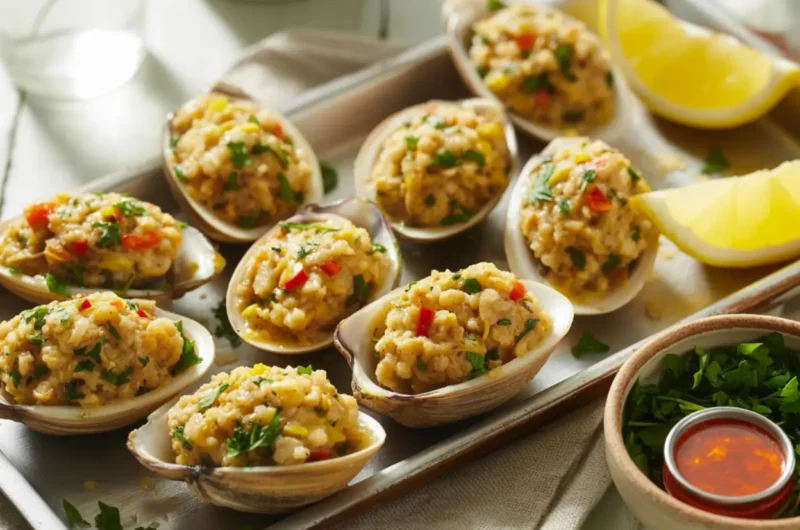
- Garnish with additional chopped parsley and serve with lemon wedges and hot sauce if desired.
What to Serve Stuffed Clam With
Stuffed clams work beautifully as both an appetizer or main course, depending on how they’re paired:
As an Appetizer:
- Lemon wedges and fresh parsley for garnish
- Simple green salad with lemon vinaigrette
- Chilled cucumber soup in small cups
- Marinated olives and artichoke hearts
- Crisp vegetable crudités with herb dip
As a Main Course:
- Angel hair pasta tossed with olive oil, garlic, and herbs
- Roasted fingerling potatoes with rosemary
- Grilled asparagus with lemon
- Steamed green beans with almond slivers
- Wild rice pilaf with herbs
Complementary Seafood Dishes:
- Grilled fish with herb butter
- Simple shrimp scampi
- Seafood chowder (for a soup-and-stuffie combo)
- Steamed mussels in tomato broth
- Seared scallops with citrus
Beverage Pairings:
- Crisp white wines like Pinot Grigio, Sauvignon Blanc, or unoaked Chardonnay
- Light-bodied beers such as pilsners or wheat beers
- Sparkling water with lemon
- Cucumber-infused water
- Iced tea with lemon and mint
Top Tips for Perfecting Stuffed Clam
Secret #1: Mastering Clam Selection and Preparation
The foundation for exceptional stuffed clams begins with selecting and handling the shellfish properly:
- Choose the right size: Look for large quahog or cherrystone clams, which provide ample meat and sturdy shells for stuffing. Littlenecks are generally too small for this application.
- Freshness indicators: Fresh clams should have tightly closed shells or shells that close promptly when tapped. They should smell pleasantly of the ocean, never fishy or ammonia-like.
- Purging technique: If your clams came from a sandy area, purge them before cooking by soaking in cold, salted water (1/3 cup kosher salt per gallon of water) for 30 minutes, then rinse thoroughly. This encourages them to expel sand.
- Never overcook: Steam clams just until they open—any longer and the meat becomes tough and rubbery. Remove each clam as it opens rather than waiting for all to open at once.
- Shell selection: Choose the deepest half-shells for stuffing. The curved bottom shells generally work better than the flatter top shells, providing a natural bowl for the stuffing.
Secret #2: Creating the Perfect Bread Stuffing Texture
The stuffing’s consistency is critical to success:
- Breadcrumb source matters: Make fresh breadcrumbs from day-old, good-quality bread (Italian or French bread works best). Avoid pre-packaged breadcrumbs, which often lack texture and flavor.
- Making perfect breadcrumbs: For ideal texture, remove crusts from day-old bread, tear into pieces, and pulse in a food processor until coarse but not powdery.
- Moisture balance: The stuffing should be moist enough to hold together when pressed but not soggy. The exact amount of clam broth needed can vary based on your breadcrumbs’ dryness.
- Egg function: The eggs act as a binder, helping hold the stuffing together during baking without making it heavy.
- Rest before stuffing: Allow the completed mixture to sit for 5 minutes before stuffing the shells. This gives the breadcrumbs time to absorb the liquid, resulting in a more cohesive filling.
Secret #3: Maximizing Clam Flavor Throughout
Amplifying the natural clam flavor creates depth throughout the dish:
- Reserve and strain all juices: Every drop of clam juice contains flavor. Collect juices when shucking and carefully strain the steaming liquid to remove grit while preserving flavor.
- Clam meat size: Chop clam meat to a medium-fine texture—too large and the stuffing won’t hold together; too fine and you lose the textural contrast of distinct clam pieces.
- Seafood distribution: Fold the chopped clams into the stuffing gently and as the final step, ensuring even distribution without breaking up the pieces too much.
- Enhance without masking: The aromatic vegetables and herbs should complement the clam flavor, not overpower it. This is why we use moderate amounts of garlic and select herbs that pair well with seafood.
- Lemon brightness: The combination of zest and juice adds brightness that balances the richness and enhances the natural sweetness of the clams.
Secret #4: Perfecting the Flavor Balance
Achieving the ideal flavor profile requires careful attention to several components:
- Salt carefully: Add salt sparingly, tasting as you go. Remember that clam broth and Parmesan cheese both contribute saltiness already.
- Heat calibration: The red pepper flakes provide a subtle background heat. Adjust the amount based on preference, but avoid overwhelming the delicate clam flavor.
- Herb harmony: Thyme and parsley are traditional partners for seafood because they enhance without dominating. Fresh herbs make a significant difference in brightness and flavor.
- Allium approach: Cooking the onions and garlic just until soft creates sweetness without any harsh raw flavor. Browning would add unwanted bitterness.
- Cheese moderation: While Parmesan adds wonderful umami, using too much can overwhelm the clams. Stick to the recommended amount for balanced flavor.
Secret #5: Mastering the Cooking Method
Proper baking techniques ensure the perfect texture contrast between crisp top and moist interior:
- Proper oven temperature: Baking at 375°F allows for thorough cooking without burning the tops before the interior heats through.
- Shell stability: Creating a bed of kosher salt or crumpled foil prevents tipping during baking, which would spill precious filling.
- The oil drizzle: A light drizzle of olive oil over the stuffing promotes browning and adds a subtle richness.
- Two-stage cooking option: For maximum texture contrast, bake until almost done, then finish under the broiler for 1-2 minutes to create a golden, crispy top.
- Resting period: The brief 3-5 minute rest after baking allows the stuffing to set slightly, making it easier to handle and enhancing the eating experience.
Secret #6: Make-Ahead Strategies for Entertaining
Stuffed clams can be partially prepared in advance to make entertaining easier:
- Component preparation: The vegetable base can be prepared up to 2 days ahead and refrigerated in an airtight container.
- Shell and clam preparation: Clams can be steamed, shucked, and chopped up to 24 hours in advance. Store the shells and meat separately, both refrigerated.
- Complete stuffing preparation: The entire stuffing mixture (without filling the shells) can be prepared up to 6 hours ahead and refrigerated. Bring to room temperature for 15 minutes before filling shells.
- Fully assembled, unbaked: Stuffed clams can be assembled and refrigerated up to 4 hours before baking. Allow them to sit at room temperature for 15 minutes before baking to ensure even cooking.
- Par-baked option: For the freshest result while still saving time, par-bake the stuffed clams for 15 minutes, then finish with 10 minutes of baking just before serving.
Secret #7: Presentation and Serving Details
The final touches elevate the entire experience:
- Serving temperature: Stuffed clams are best served warm, not piping hot. The brief rest after baking allows flavors to settle.
- Garnish with purpose: Fresh herbs and lemon wedges aren’t just decorative—they add final notes of flavor when squeezed over the stuffed clams.
- Serving vessel considerations: Presenting on a bed of rock salt not only looks impressive but helps stabilize the shells and keep them warm longer.
- Accompaniment timing: If serving as an appetizer, have all accompaniments ready before the stuffed clams come out of the oven to serve at peak freshness.
- Individual serving plates: For a more elegant presentation, place two stuffed clams on small individual plates with a lemon wedge and a sprinkle of chopped parsley.
Storing and Reheating Tips
While stuffed clams are best enjoyed freshly made, proper storage and reheating can maintain their quality for later enjoyment:
Short-Term Storage:
- Store leftover stuffed clams in an airtight container in the refrigerator for up to 2 days.
- Place them in a single layer if possible, or separate layers with parchment paper to prevent the tops from getting soggy.
- For best results, reserve any unused stuffing mixture separately from already-stuffed shells, as they’ll keep better and can be freshly baked when needed.
Freezing Options:
- Stuffed clams freeze surprisingly well for up to 1 month.
- To freeze, place fully cooled stuffed clams on a baking sheet in a single layer and freeze until solid (about 2 hours).
- Once frozen, transfer to an airtight container or heavy-duty freezer bags, separating layers with parchment paper.
- Label with the date and contents for easy identification.
- For best quality, freeze unbaked stuffed clams rather than already-baked ones.
Reheating Methods:
- From Refrigerated (Best Method):
- Preheat oven to 375°F (190°C).
- Place refrigerated stuffed clams on a baking sheet.
- Drizzle with a few drops of olive oil to help restore moisture.
- Bake for 10-15 minutes until heated through and crisp on top.
- From Frozen:
- Preheat oven to 375°F (190°C).
- Place frozen stuffed clams directly on a baking sheet (no thawing necessary).
- Bake for 20-25 minutes until completely heated through and crispy on top.
- If tops begin to brown too quickly, cover loosely with foil until heated through, then uncover for the last few minutes.
- Broiler Method (Quick Option):
- Preheat broiler with rack positioned about 6 inches from the heat.
- Place previously baked stuffed clams on a baking sheet.
- Broil for 2-3 minutes, watching carefully to prevent burning.
- This method works best for refrigerated leftovers, not frozen ones.
- Toaster Oven Option:
- Preheat to 375°F (190°C).
- Reheat for 8-10 minutes (refrigerated) or 15-18 minutes (from frozen).
- This is an energy-efficient option for reheating smaller quantities.
- Microwave (Not Recommended, but Possible):
- While not ideal as it sacrifices the crispy top, if necessary, microwave on 50% power for 1-2 minutes.
- To restore some crispness, finish under a broiler for 1 minute if possible.
Quality Restoration Tips:
- Sprinkle a few drops of water or additional clam broth on the stuffing before reheating to help restore moisture.
- Add a light drizzle of fresh olive oil before reheating to enhance richness.
- Garnish reheated stuffed clams with fresh herbs and a squeeze of lemon to brighten flavors.
- Serve with additional lemon wedges to add freshness to reheated portions.
Food Safety Reminder:
- Never leave stuffed clams at room temperature for more than 2 hours.
- Always reheat leftovers to an internal temperature of 165°F (74°C) for food safety.
- If stuffed clams have been left out or improperly stored, discard them rather than risking foodborne illness.
By incorporating these seven secrets and following this detailed guide, you’ll create stuffed clams that perfectly balance briny seafood flavor with savory, herb-infused stuffing. Whether served as an impressive appetizer or a satisfying main course, this classic seafood dish brings the taste of the coast to your table with techniques that are accessible to home cooks of any skill level. The contrast between the crispy topping and moist, flavorful interior creates a textural experience that makes these stuffed clams truly memorable.
Stuffed Clam: 7 Secrets to Perfect Seafood Bites
Cuisine: AmericanDifficulty: Moderate6
servings35
minutes25
minutes300–350
kcalStuffed Clams are a beloved coastal classic, combining tender chopped clams with a savory, herb-studded breadcrumb mixture baked right in their shells. This version uses fresh quahogs or cherrystone clams, aromatic vegetables, Parmesan, and lemon to create a flavorful, golden topping that’s both crispy and moist. Perfect as a starter or light main, these clams bring together the essence of the sea with comforting, homemade flavors.
Ingredients
18 large quahog or cherrystone clams (about 4-5 pounds), scrubbed clean
1 cup water
1 bay leaf
1 sprig fresh thyme
4 tablespoons unsalted butter
1 medium yellow onion, finely diced (about 1 cup)
2 stalks celery, finely diced (about ½ cup)
1 medium red bell pepper, finely diced (about ½ cup)
4 cloves garlic, minced
¼ teaspoon red pepper flakes (adjust to taste)
1 teaspoon dried oregano
1 tablespoon fresh thyme leaves, chopped (or 1 teaspoon dried)
2 tablespoons fresh parsley, chopped, plus extra for garnish
3 cups fresh breadcrumbs (from about 6-8 slices day-old Italian or French bread)
½ cup grated Parmesan cheese
2 tablespoons olive oil, plus more for drizzling
1 tablespoon lemon zest (from 1 lemon)
2 tablespoons fresh lemon juice
2 large eggs, lightly beaten
½ teaspoon kosher salt (adjust to taste, as clam broth is naturally salty)
½ teaspoon freshly ground black pepper
Lemon wedges
Additional chopped fresh parsley
Hot sauce (optional, for serving)
Directions
- Steam and Clean the Clams
Start by scrubbing the clams thoroughly under cold water to remove any sand. In a large pot, simmer water with a bay leaf and thyme sprig, then add the clams and steam until they just open—about 5–10 minutes. Remove each clam as it opens and discard any that stay shut. Strain the cooking liquid to remove grit and save the broth. Let the clams cool slightly before handling. - Prep the Clam Meat and Shells
Carefully remove the clam meat from the shells, saving both. Choose 12 of the best shell halves (the deeper ones work best), rinse them, and set aside. Finely chop the clam meat and refrigerate it while you prepare the stuffing. - Sauté the Aromatics
Preheat your oven to 375°F (190°C). In a skillet, melt butter over medium heat and cook the diced onion, celery, and red bell pepper until soft, about 5–7 minutes. Add garlic, red pepper flakes, oregano, thyme, and parsley, cooking another 1–2 minutes until fragrant. Remove from heat and let the mixture cool slightly. - Make the Stuffing
In a large bowl, mix breadcrumbs, Parmesan, olive oil, lemon zest, and the cooled vegetable mixture. Stir in ¾ cup of reserved clam broth, lemon juice, and the beaten eggs. Gently fold in the chopped clam meat, more parsley, salt, and pepper. Adjust moisture as needed with more broth or breadcrumbs—the stuffing should be moist but not soggy. - Stuff and Bake the Clams
Place the clean clam shells on a baking sheet (use salt or foil to steady them if needed). Spoon the stuffing into each shell, lightly pressing it in. Drizzle the tops with olive oil and bake for 20–25 minutes, or until golden brown. For extra crispness, broil for 2 minutes at the end. Let them cool slightly before serving, then garnish with parsley, lemon wedges, and optional hot sauce.
Notes
- This dish is a celebration of East Coast seafood traditions. Using fresh clams and homemade breadcrumbs makes a noticeable difference in flavor and texture. The addition of lemon zest, Parmesan, and fresh herbs brightens the dish beautifully. For extra heat, serve with hot sauce on the side, and don’t forget a squeeze of fresh lemon before serving—it’s the finishing touch that brings it all together.