Tuna Pasta Salad Recipe: Best Tips for Meal Prep Success
Table of Contents
There’s something undeniably perfect about a well-crafted tuna pasta salad. It’s one of those versatile dishes that somehow manages to be both nostalgically comforting and endlessly customizable. After years of perfecting my approach to this classic, I’ve developed a tuna pasta salad recipe that strikes the ideal balance between creamy texture and bright flavors, with just the right ratio of pasta to tuna and vegetables.
Thank you for reading this post, don't forget to subscribe!What makes this recipe particularly valuable is how brilliantly it performs as a meal prep staple. Whether you’re looking for make-ahead lunches that actually improve with time in the refrigerator, a reliable potluck contribution that won’t wilt, or a quick dinner solution on busy weeknights, this tuna pasta salad delivers impressive results every time. The key is understanding not just the basic preparation, but also the nuances that elevate it from good to exceptional—everything from pasta selection to dressing ratios to the ideal chilling time. Let me walk you through my foolproof approach to creating a tuna pasta salad that will have everyone asking for your recipe.
How to Make Tuna Pasta Salad
Quick Overview
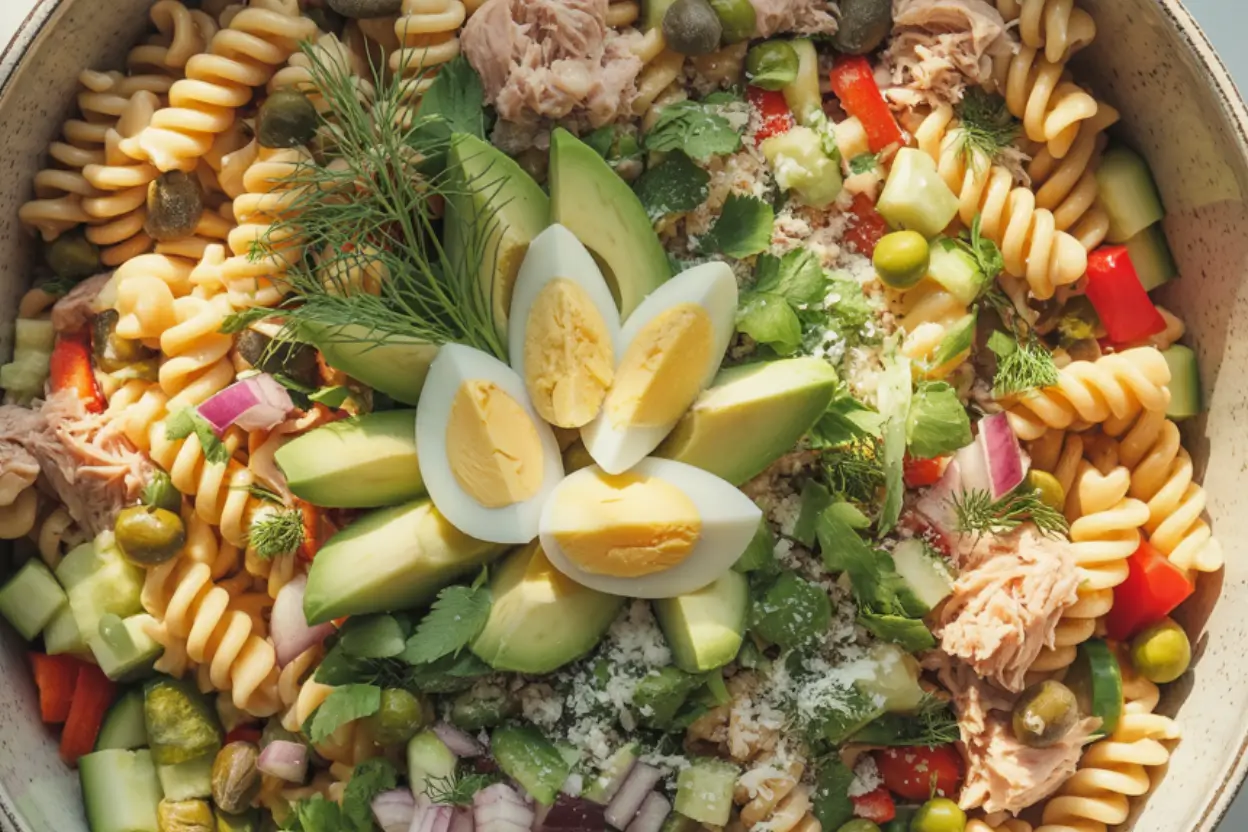
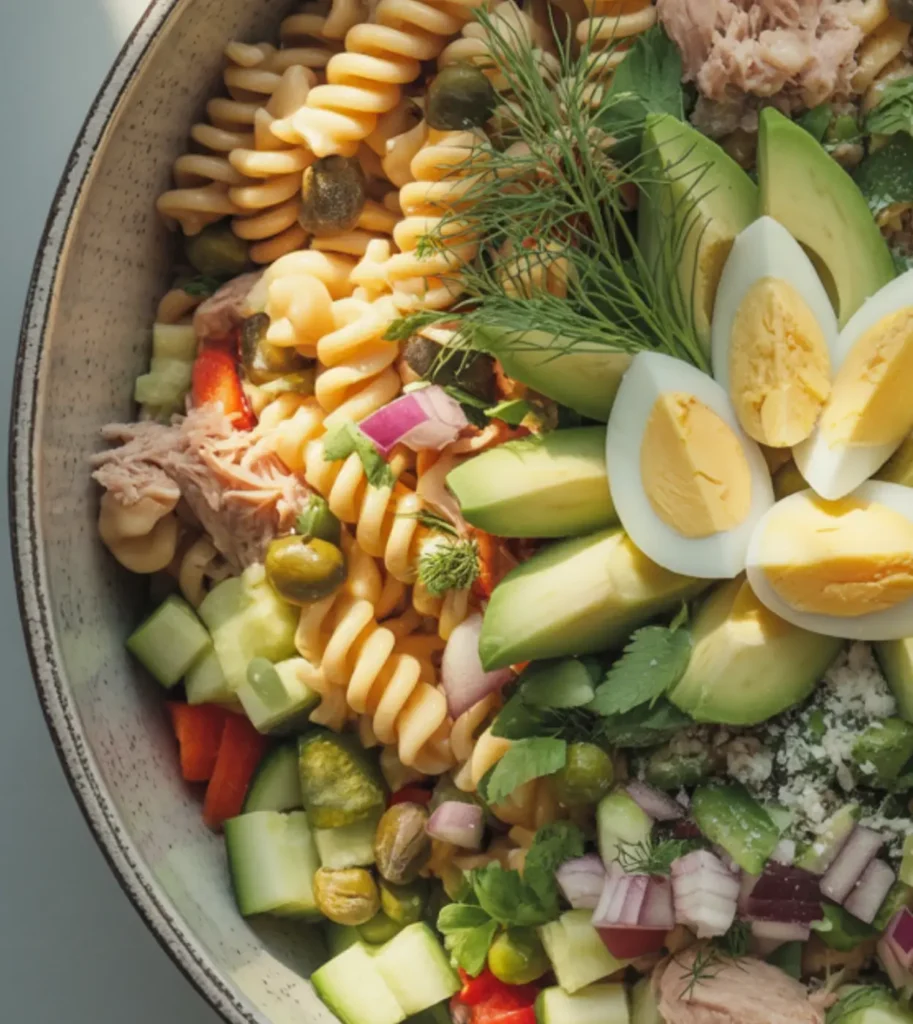
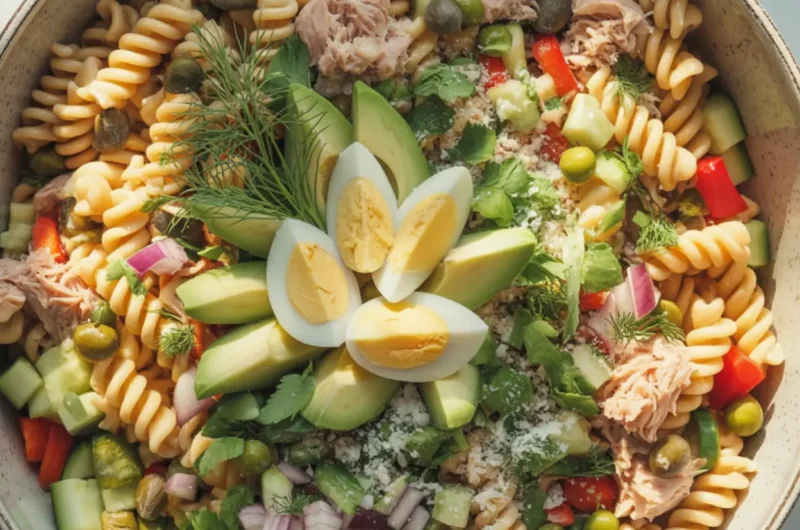
This tuna pasta salad delivers the perfect balance of creamy texture and fresh flavors, creating a versatile dish that works equally well for casual lunches, picnics, and potlucks. What makes this version special is how it combines classic ingredients – tender pasta, protein-rich tuna, and crisp vegetables – with a dressing that’s creamy without being heavy. The addition of dill pickles, fresh herbs, and a touch of Dijon provides depth and brightness that distinguishes this from standard deli versions.
One of the greatest advantages of this recipe is its efficiency and make-ahead potential. From start to finish, you’re looking at approximately 25 minutes of active preparation time, most of which involves chopping vegetables and stirring together the dressing while the pasta cooks. Once assembled, the salad benefits from at least 2 hours of chilling time, during which the flavors meld beautifully. This makes it an ideal meal prep option that actually improves with a day or two in the refrigerator, saving you valuable time during busy weeks. The result is a satisfying, protein-packed meal that offers both convenience and great taste without requiring complicated techniques or hard-to-find ingredients.
The Ingredients I Use to Bring My Tuna Pasta Salad to Life
For the pasta and main components:
- 8 ounces (about 2½ cups) medium pasta shapes such as rotini, fusilli, or bow ties
- 2 cans (5 ounces each) chunk light or solid white albacore tuna in water, drained well
- 1 cup celery, finely diced (about 2-3 ribs)
- ½ cup red onion, finely diced
- 1 red bell pepper, seeded and diced
- ¾ cup English cucumber, seeds removed and diced
- ⅓ cup dill pickles, finely chopped
- 2 tablespoons fresh parsley, chopped
- 1 tablespoon chopped fresh dill (or 1 teaspoon dried dill)
For the creamy dressing:
- ⅔ cup good-quality mayonnaise
- ¼ cup plain Greek yogurt (full-fat preferred for creaminess)
- 1 tablespoon Dijon mustard
- 1 tablespoon apple cider vinegar
- 1 tablespoon fresh lemon juice
- 1 teaspoon honey
- 2 cloves garlic, minced or pressed
- ½ teaspoon dried dill
- ½ teaspoon dried oregano
- ¼ teaspoon paprika
- ½ teaspoon kosher salt, plus more to taste
- ¼ teaspoon freshly ground black pepper
Optional add-ins (choose 2-3 for additional flavor and texture):
- 2 hard-boiled eggs, peeled and chopped
- ⅓ cup sliced black olives
- ¼ cup drained capers
- ½ cup frozen peas, thawed
- ¼ cup grated Parmesan cheese
- ½ avocado, diced (add just before serving)
Step-by-Step Instructions
Step 1: Cook the Pasta Properly
- Bring a large pot of water to a rolling boil, then add 1 tablespoon of salt—this step is key to ensuring the pasta is well-seasoned.
- Add the pasta to the boiling water and cook it according to the package instructions until al dente. For cold pasta salads, I stick to the minimum recommended cooking time, since the pasta will continue to soak up moisture from the dressing afterward.
- While the pasta is cooking, set up an ice bath by filling a large bowl with cold water and a handful of ice cubes.
- Once the pasta reaches al dente, drain it thoroughly in a colander, but do not rinse it yet.
- Immediately transfer the hot pasta to the ice bath to halt the cooking process. Let it sit for about 1 minute, then drain thoroughly again.
- Transfer the cooled pasta to a large mixing bowl and toss with 1 teaspoon of olive oil to prevent sticking while you prepare the other ingredients. This small amount of oil creates a barrier that helps the pasta maintain its texture.
Step 2: Prepare the Tuna and Vegetables
- Drain the tuna cans thoroughly, pressing with the can lid to remove as much liquid as possible. Excess moisture will dilute your dressing and potentially make the salad soggy.
- Transfer the drained tuna to a medium bowl and use a fork to flake it into bite-sized pieces, maintaining some texture rather than mashing it completely.
- In a separate cutting board, prepare all your vegetables according to the ingredient list. Aim for uniformity in your chopping – pieces should be small enough to get multiple components in each bite, but not so small that they lose their texture.
- For the cucumber, I recommend scraping out the seeds with a spoon before dicing to prevent excess water in your salad. Similarly, after dicing the red onion, you can place it in a small bowl of cold water for 5 minutes, then drain and pat dry to reduce its sharpness if desired.
- Combine the chopped vegetables, pickles, and herbs in a large bowl, keeping them separate from the pasta for now.
Step 3: Create the Creamy Dressing
- In a medium bowl, combine the mayonnaise, Greek yogurt, Dijon mustard, apple cider vinegar, lemon juice, and honey. Whisk until smooth and well combined.
- Add the minced garlic, dried dill, oregano, paprika, salt, and pepper. Whisk again until all herbs and spices are evenly incorporated throughout the dressing.
- Taste the dressing and adjust seasonings according to your preference. Add more salt, pepper, or lemon juice as needed. The dressing should taste slightly stronger than you want the final salad to taste, as the pasta will mellow the flavors.
- If the dressing seems too thick, add 1-2 teaspoons of cold water and whisk until you reach your desired consistency.
Step 4: Combine and Chill the Salad
- Add the flaked tuna to the bowl with the pasta and gently toss to combine.
- Add the vegetable mixture to the pasta and tuna. Fold everything together gently using a large rubber spatula or wooden spoon, being careful not to break up the tuna too much or mash the pasta.
- Pour about ¾ of the prepared dressing over the salad and fold again until all ingredients are evenly coated. Depending on the exact pasta shape and quantity, you may need more or less dressing, so add gradually.
- If using any of the optional add-ins like hard-boiled eggs, olives, or capers, fold them in now. Save ingredients like avocado or fresh herbs for just before serving.
- Tightly cover the bowl with plastic wrap and refrigerate for at least 2 hours—ideally 4 to 24 hours—to let the flavors fully develop.
- Before serving, taste the chilled salad and add the remaining dressing as needed (the pasta will have absorbed some of the initial dressing). Adjust seasoning with additional salt, pepper, or lemon juice as desired.
- Give the salad a final gentle toss and transfer to a serving bowl. Garnish with additional fresh herbs, a sprinkle of paprika, or a wedge of lemon for visual appeal.
What to Serve Tuna Pasta Salad With
Tuna pasta salad works beautifully as a stand-alone meal or as part of a larger spread. Here are some excellent pairings to consider:
For a light lunch or dinner:
- Fresh crusty bread or garlic bread
- Butter lettuce cups for a low-carb option to scoop the salad
- Toasted pita triangles or whole grain crackers
- Simple tomato soup for a nostalgic soup-and-salad combo
For picnics and potlucks:
- Grilled chicken skewers
- Fresh fruit platter with berries, melon, and grapes
- Caprese skewers with cherry tomatoes, mozzarella, and basil
- Deviled eggs for a retro-inspired spread
Vegetable sides:
- Marinated vegetable antipasto
- Simple green salad with vinaigrette
- Cucumber and tomato salad
- Grilled vegetables like zucchini, bell peppers, and asparagus
Beverage pairings:
- Iced tea with lemon
- Bright, crisp white wines such as Pinot Grigio or Sauvignon Blanc
- Light lagers or pilsners
- Sparkling water with cucumber and lime
For a more substantial meal:
- Grilled seafood like shrimp or salmon
- Rotisserie chicken
- Sliced prosciutto or other charcuterie
- Mediterranean mezze platter with hummus and olives
Top Tips for Perfecting Tuna Pasta Salad
- Choose the right pasta shape: The ideal pasta for tuna salad has nooks and crannies to catch and hold the dressing. My top choices are rotini, fusilli, farfalle (bow ties), or medium shells. Avoid long pastas like spaghetti or linguine, which are difficult to eat in a cold salad. For a more modern twist, try tricolor pasta for visual appeal or whole wheat pasta for added nutrition and a heartier texture.
- Tuna selection makes a difference: While any canned tuna works, each variety offers different benefits. Solid white albacore provides larger, firmer chunks and a milder flavor, while chunk light tuna has a stronger flavor and softer texture. For the best quality, look for pole-caught or troll-caught tuna, which is more sustainably harvested. Oil-packed tuna can add richness, but drain it very well and reduce the mayo slightly to compensate.
- Master the dressing balance: The key to a dressing that perfectly coats without becoming soupy is the ratio of creamy elements to acids. If your salad seems too dry after chilling, don’t just add more mayonnaise – instead, mix 1 tablespoon each of mayo and Greek yogurt with 1 teaspoon of lemon juice, which maintains the flavor balance while adding moisture. Conversely, if your salad seems too wet, add an extra handful of vegetables with high crunch factor, like celery or bell peppers.
- Proper chilling technique: While the salad needs to chill, proper technique prevents it from drying out. First, make sure your storage container has an airtight seal. Second, place plastic wrap directly on the surface of the salad before putting the lid on, which prevents air exposure. Finally, reserve about ¼ of your dressing to refresh the salad right before serving, as the pasta will continue absorbing liquid while it sits.
- Texture preservation methods:
- For crisp vegetables, days later, salt and drain high-water veggies like cucumber and tomatoes on paper towels for 10 minutes before adding
- Add watery vegetables like tomatoes only to the portion you’ll eat immediately
- For meal prep, consider keeping crunchy components separate until serving time
- A tablespoon of sour cream in the dressing helps prevent it from fully absorbing into the pasta
- Ingredient substitutions and variations:
- Protein alternatives: Use canned salmon, chicken, or chickpeas instead of tuna
- Make it Mediterranean with olives, artichoke hearts, feta, and sun-dried tomatoes
- For a lighter version, use 100% Greek yogurt in place of mayonnaise
- Add a tablespoon of pesto to the dressing for an herbal boost
- Try curry powder (1 teaspoon) for an unexpected but delicious flavor direction
- Make-ahead sequencing for optimal freshness:
- Day 1: Cook pasta and prepare dressing
- Day 2: Add tuna and hearty vegetables (celery, bell peppers, onions)
- Days 3-5: Add more delicate ingredients as you portion and eat the salad
- Keep a small container of extra dressing to refresh each portion
Storing and Reheating Tips
Tuna pasta salad is an excellent make-ahead dish that sometimes even improves with time. Here’s how to properly store it for optimal freshness:
Short-term storage:
- Keep the salad in an airtight container in the refrigerator
- For best quality, consume within 3-5 days
- Press plastic wrap directly onto the surface of the salad before adding the lid to prevent it from drying out
- Store any unused dressing separately in a small jar to refresh the salad as needed
Meal prep strategies:
- Divide the finished salad into individual portion containers for grab-and-go lunches
- Create a layered storage approach: put dressing at the bottom of the container, pasta and tuna in the middle, and fresh vegetables on top – then invert and shake when ready to eat
- If using avocado, toss cut pieces in lemon juice before adding to individual portions to prevent browning
Not recommended for freezing:
- Tuna pasta salad generally doesn’t freeze well because the mayonnaise-based dressing will separate and the vegetables will become mushy upon thawing
- If you must freeze components, freeze just the cooked, plain pasta and add fresh ingredients after thawing
Reviving refrigerated salad:
- Let the chilled salad sit at room temperature for 15 minutes before serving to take the edge off the cold
- Add a splash of fresh lemon juice and a drizzle of olive oil to brighten flavors that may have dulled in the refrigerator
- Toss in a handful of freshly chopped herbs or a sprinkle of paprika to refresh both the flavor and appearance
- If the salad seems dry, mix 1 tablespoon each of mayonnaise and Greek yogurt with a splash of lemon juice and fold it through
Adjustments over time:
- Day 1-2: The salad is brightest and the vegetables are crispest
- Day 3-4: Flavors have melded, but the texture may need refreshing; add additional crunchy vegetables
- Day 5: Best to add very fresh elements like avocado, fresh herbs, or a squeeze of citrus to revitalize the remaining salad
Food safety considerations:
- Never leave the salad at room temperature for more than 2 hours (1 hour in hot weather)
- For picnics or potlucks, store the salad in a cooler with ice packs to keep it properly chilled.
- If the salad has an off smell or appearance, discard it immediately, regardless of the date
Tuna pasta salad represents the perfect intersection of convenience, nutrition, and adaptability. This recipe takes the humble classic and elevates it with thoughtful ingredient choices and preparation techniques that ensure every bite delivers both satisfaction and flavor. Whether you’re meal-prepping for a busy week ahead, contributing to a potluck spread, or simply looking for a reliable, protein-rich meal that requires minimal effort, this version delivers consistently excellent results.
What makes this particular approach to tuna pasta salad special is the attention to detail, from properly cooling the pasta to creating a balanced dressing that complements rather than overwhelms the other ingredients. These small but significant steps transform what could be an ordinary dish into something that people will genuinely look forward to eating, even several days after preparation.
By mastering this versatile recipe and understanding the principles behind successful storage and refreshing techniques, you’ll add a valuable skill to your culinary repertoire. The best part is how easily it can be adapted to suit different dietary preferences, ingredient availability, or flavor profiles while maintaining its fundamental appeal as a satisfying, complete meal in one simple dish.
click here to follow me on pinterest
Tuna Pasta Salad Recipe: Best Tips for Meal Prep Success
Cuisine: AmericanDifficulty: Easy6-8
servings25
minutes10
minutes400-450
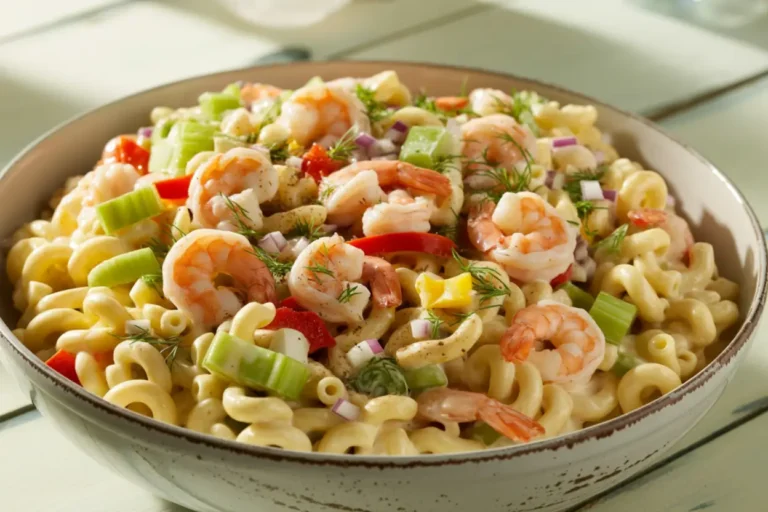
kcalThis vibrant and hearty Tuna Pasta Salad combines tender pasta with flaky tuna, crisp vegetables, and a creamy herb-infused dressing. Bursting with color and flavor from ingredients like bell pepper, red onion, pickles, olives, and fresh herbs, it’s a satisfying dish perfect for lunches, potlucks, or summer gatherings.
Ingredients
8 ounces (about 2½ cups) medium pasta shapes such as rotini, fusilli, or bow ties
2 cans (5 ounces each) chunk light or solid white albacore tuna in water, drained well
1 cup celery, finely diced (about 2-3 ribs)
½ cup red onion, finely diced
1 red bell pepper, seeded and diced
¾ cup English cucumber, seeds removed and diced
⅓ cup dill pickles, finely chopped
2 tablespoons fresh parsley, chopped
1 tablespoon fresh dill, chopped (or 1 teaspoon dried)
⅔ cup good-quality mayonnaise
¼ cup plain Greek yogurt (full-fat preferred for creaminess)
1 tablespoon Dijon mustard
1 tablespoon apple cider vinegar
1 tablespoon fresh lemon juice
1 teaspoon honey
2 cloves garlic, minced or pressed
½ teaspoon dried dill
½ teaspoon dried oregano
¼ teaspoon paprika
½ teaspoon kosher salt, plus more to taste
¼ teaspoon freshly ground black pepper
2 hard-boiled eggs, peeled and chopped
⅓ cup sliced black olives
¼ cup drained capers
½ cup frozen peas, thawed
¼ cup grated Parmesan cheese
½ avocado, diced (add just before serving)
Instructions
- Cook and Cool the Pasta
Boil a large pot of water, add 1 tablespoon of salt, and cook the pasta until al dente following the minimum package time. While it cooks, prepare an ice bath. Once cooked, drain the pasta and transfer it immediately into the ice bath to stop the cooking process. Drain again and toss with a teaspoon of olive oil to prevent sticking. Set aside. - Prep the Tuna and Vegetables
Drain and flake the tuna into bite-sized chunks. Dice the celery, red onion, red bell pepper, cucumber (remove seeds), dill pickles, and herbs. Optional: soak chopped onion in cold water for 5 minutes to reduce sharpness. Combine all chopped vegetables and herbs in a separate bowl. - Make the Creamy Dressing
Whisk together mayonnaise, Greek yogurt, Dijon mustard, apple cider vinegar, lemon juice, and honey. Add garlic, dried herbs, paprika, salt, and pepper. Taste and adjust seasoning. Thin with a little water if needed for a smooth, pourable consistency. - Combine, Chill, and Serve
Mix the tuna and pasta in a large bowl. Add the vegetables and fold gently. Pour in about ¾ of the dressing and mix until well coated. Fold in optional add-ins like chopped eggs, olives, or capers. Cover and chill for at least 2 hours (up to 24 for best flavor). Add diced avocado and extra dressing just before serving. Garnish and enjoy!
Notes
- This recipe is wonderfully flexible and packed with texture and nutrition. The combination of mayonnaise and Greek yogurt creates a creamy base without being too heavy, while the fresh herbs, lemon juice, and apple cider vinegar brighten up the whole dish. For best flavor, chill it for a few hours before serving. Don’t forget to add the avocado just before serving to maintain its color and texture. Great as a meal prep option or served cold at your next gathering!